Students and faculty from California State University Northridge teamed with Hollywood professionals to produce two 30-second video public service announcements for the FBI. Production took place this past weekend (Oct 29-30, 2011) on the campus of CSUN. Professor Nate Thomas, head of the Film Production option in the Cinema Television Arts Dept, produced the spots with a grant from the FBI CyberCrime Division.
I thought that it might be educational to talk about the Production Audio aspects of this shoot. But first, a brief overview of what was involved.
Over the course of two days, a crew made up primarily of CSUN students was to shoot footage for two thirty-second spots. A RED camera was rented locally. The Consulting Director of Photography was Adjunct Production Faculty Richard Ollis, who instructs cinematography for the program. He oversaw the student camera crew, lighting & electrical, and a professional Steadicam Operator. Consulting with the student Production Sound team was yours truly (Fred Ginsburg CAS -- also on the faculty at CSUN). In charge of the whole project and serving as Producer and (sometimes) co-Director was Professor Nate Thomas.
Most of Saturday was spent filming a scene in the sound stage. The set was supposed to depict an (Eastern European) "sweat shop". Here is how it went from the audio standpoint.
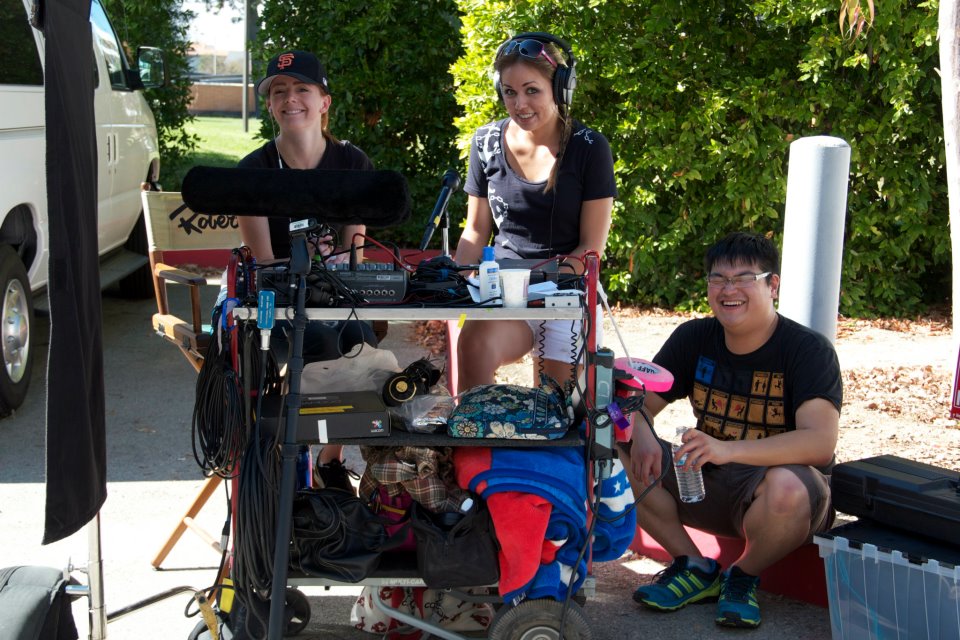 Our Mixer (Leandra Dichirico), Boom (Min Hu), and Utility (Katie Shiel) are all current CSUN students, and had all previously done well in Fred Ginsburg's sound class last year. The basic package consisted of a Sound Devices 702T two-track digital recorder with timecode, a Mackie 1402 (6x2) mixing panel, duplex cable, boompole, MKH40 condenser mic, ME66 electret condenser mic, soundcart, cables, and so on.
The first set-up was pretty simple, as far as audio was concerned. An actor (portraying the overseer) moves in behind a couple of workers and shouts at them to "Get to work. Get to work" with threatening encouragement. A tricky shot for the Steadicam, but easy for sound. All we had to do was boom from overhead, and it was no problem to stay only 2 to 3 feet above talent and to follow his movement entering the scene and intimidating the workers.
To minimize the acoustic echo in the spartan and simplistically decorated set, our Sound Mixer chose to use the Sennheiser MKH40. The MKH40 is a fairly wide (cardioid) condenser microphone, with a lot of overall sensitivity and a moderately wide pickup angle that serves to minimize echo in a hard set. An alternate choice would have been the Audio Technica AT4051, but the rental house stocked Sennheiser, so that was what was rented. I completely agreed with the selection of mic, and felt good that my students remembered what they had been taught.
The timecode of the Sound Devices702T recorder and Denecke TS-3 smart slate were set to the same frame rate as the RED, in this case 23.976 fps.
Our Sound Mixer confessed that she did not have a stand alone tone generator, and was intending to just use the tone generator in the recorder. I loaned her a Behringer CT100, which is a $39 miracle box that combines cable checker and tone generator into one handy device. It is better to run tone through your mixing board, so that you can align the zero from your board to the recording level of your recorder (in this instance, minus 20dB on the Sound Devices).
The boom operator discovered that the duplex cable that had been rented was wired for a stereo input/output, rather than monaural. Boom operators do not need to listen in stereo; in fact, it can be quite disconcerting to monitor different mics in different ears. I have taught my students that the best place to plug in the boom cable is NOT a Y-adapter in the mixer's headphone jack, but rather a post-fader Aux Output Send. The Aux Send is a mono signal, and the boom operator can control their own volume from the Aux Send Master knob. In addition, the Aux controls allow the Mixer to adjust the monitor level of any individual input, so that the Boom Operator does not have to get blasted by the tone generator, or disturbed by sound effects only mics, etc.
Fortunately, the solution to the duplex cable was a simple one. I just provided the Boomperson a stereo mini jack to mono 1/4-plug headphone adapter, and that gave him good audio in both ears.
The next hurdle for the Sound Mixer was to get over her intimidation at working with the head of the Film Program and a professional Director! It is never easy to call for "30 seconds of room tone" on any set, but you have to be strong and assertive. It is essential for the editors, and imperative that you record proper room tone for each major set-up or location.
I always recommend calling out for the thirty seconds of "silence" on the first take. Get it done and out of the way BEFORE the Director and actors get into a rhythm. In this case, we did not get the room tone done until the second or third take -- but it was still early enough not to upset the flow of the shoot. Because it was a RED camera, the camera had to be rolling and "set" in order for the internal fans to shut down to enable "silent" running.
During all of the dialogue scenes, the background actors were instructed to make no noise, and to pantomime any conversation or labor.
After the first take of dialogue, it became apparent to the Sound Mixer that the lead actor was capable of a wide range of volume in his performance. He played the scene to intimidate the workers, and that involved going from a low rumble to a lion's roar!
I showed our student Mixer that she could take advantage of having two tracks on the recorder. Since we were only using one mic for one actor, it was a simple choice to record the same audio on both tracks, but to set the second track at least 10dB lower than the primary track. Having the tone generator plugged into the Mackie board simplified this process -- she only had to pull down the master fader on the second track (the master Right Output) of the mixer so that her "zero" tone on the mixer showed up as minus twenty on track 1 and minus thirty on track 2 of the recorder. Note that you do not re-record tone at these offset levels; the recorded reference tone on the Sound Devices remains at negative twenty on both tracks. You only USE the tone in order to re-adjust the levels from the mixing board out to the recorder.
After the sync dialogue scenes were finished with, they went in to shoot inserts and close-up angles. Sound took that opportunity to record some P-FX (production sync sound effects) of everyone toiling at their workbenches. In addition, after the camera work was completed, we recorded a few minutes of wild background tracks of everyone working. This would give our editors lots of choices, as well as the option to layer background over background for a more dimensional sound design.
The next PSA spot was shot in a regular classroom. Again, the MKH40 was the microphone of choice in order to minimize the echo. This time around, our sound mixer was confident enough to record her thirty seconds of room tone on take one. Later, she had no problem getting some background tracks, as well.
We were concerned over recording a good sync P-FX track of an actress typing on her laptop computer keyboard. Until we saw the final framing, we were thinking about hiding a lavalier on the chair/desk to accentuate the typing sounds. A good mic for this would have been the Audio Technica MT830 or the AT899; or the Sennheiser MKE-2 (which we did not have). All of these lavs are "transparent" mics: very sensitive, yet natural sounding. However, the actual framing of the shot was such that the MKH40 was close enough and directly overhead of the keyboard, so that the typing was bright and clear.
Sunday were exterior shots. The students had originally rented a Sennheiser ME66 with foam windscreen for those shots, assuming that the mic was more directional than the MKH40. The ME66 is more directional, but it is still not ultra-directional. It is considered a short shotgun, which is only medium directional. However, the ME66 is only an electret condenser type mic; not a true condenser like the MKH40 or its siblings (MKH60, MKH70). Personally, I would have rented an MKH70 long, full condenser shotgun along with a Rycote or Zeppelin windscreen.
Exterior shots can be tricky. Sometimes the Director may go a bit wide, so you need really good reach. Side noise is always an issue, so you want a mic with maximum front sensitivity and the most side rejection. Always go with a true condenser mic for the most sensitivity/reach, and the most directional pattern for the best side rejection. Industry favorites are the Sennheiser MKH70 and the Audio Technica AT4071. Luckily for the students, I had an Audio Technica AT4071a encased in a full zeppelin with furry cover to bail them out.
The shoot went off as planned. The students performed at a PROFESSIONAL level that all of us faculty could be proud of!
Around CSUN, I am known as a bit of a bear. I push all of my students to perform at a level that would be appropriate for a seasoned Hollywood vet, because that is the real world competition! Once you get that diploma, either you are as good as anyone else out there, or you find a job in the food service industry!
You-Tube is full of amateur video's. They win certiicates for free cups of coffee at the local cafe screenings.
At CSUN, our students win paychecks. Some of them, even Emmy's!