We often get asked about setting up to do audio podcasts on a tight budget from a home office or simple studio.
My personal recommendations are: Zencastr software for acquisition, and Audacity for the editing (post-production). Both offer free software.
Let’s begin with the recording side. If you are only going to do “in studio” monologues of yourself, or share your “studio” with one invited guest – you don’t even need Zencastr. Audacity, which is free software, can easily handle live recording of one or two microphones directly into your computer.
Yes, you will need either a single mic with USB output, or a USB-XLR microphone interface box (aka a mic to USB adapter box, such as the Presonus Audiobox USB96 that can handle one or two inputs). If your computer can support 1/8-inch stereo mic input, then just having the proper audio adapter cables could cover you. Check out the cables made by HOSA.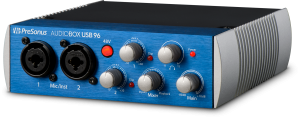
For more than two mics in your studio, you would need a proper microphone interface box along with some sort of multi-mic mixing panel. But that is getting kind of complicated, and defeats the purpose of this article, which is about getting the job done easily and cheaply.
I find that it is difficult to find qualified guests willing to travel to the house or office to participate in “amateur” podcasts offering small and limited listener audiences. It is much easier to get their cooperation if they can just “phone in remotely”. All that they would need would be a computer, a mic, and some headphones. Minimally, a set of smart phone earbuds w. mic, plugged into their computer, will work very well.
We don’t want to use an actual cell phone, or live stream VoIP (voice over internet) on account of interference, data lag time, and dropouts. You all know how bad the audio can sometimes get when using Skype or Zoom!
Zencastr solves the voice over internet problem by recording our guests remotely on their computers, and then uploading those files at the conclusion of the session to the cloud and to us. The only effort to the guest is to wait several seconds after the interview, before exiting the browser.
In addition to the tutorials provided by Zencastr on their own site, there are lots of short videos on YouTube to teach you the program. (I have included a couple links at the end of this article.)
Briefly, here is how Zencastr works. You create an episode file (folder). Your mic records to its own track. Your guest is sent a link, which connects them to you. Their audio track shows up on a separate timeline, right under yours.
You check your software/hardware settings such as mic level; and walk your guest on how to check their settings at their end. It is pretty simple, don’t worry.
Start recording. Always record several seconds of “room tone” at the beginning of the session, prior to your first question. (This will come in very useful during editing, in order to clean up your tracks in Audacity.)
Zencastr will allow both of you to hear each other “live”, via headphones. During the interview, you can type “chat” notes to your guest for prompting or direction.
On your computer screen, you will see the waveforms of your track and your guests’ tracks as you record. Note that each participant is on their own individual track, even though you hear the “mix” live in your headphones.
When the interview ends, and you stop recording, Zencastr will automatically upload all of the guest files. As I mentioned previously, you need to instruct your guests NOT to exit the program until they see the confirmation message on their screen that the upload is completed. Audio files are relatively small, so this upload only takes a few moments.
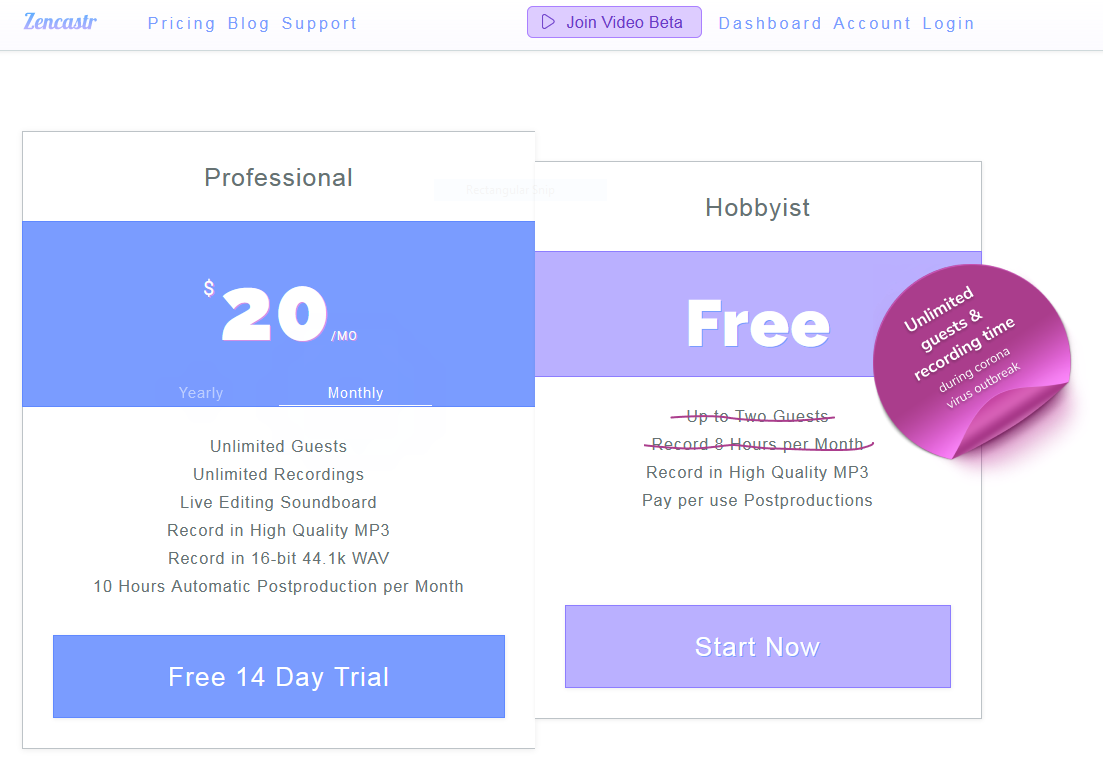 The free version of Zencastr only records in MP3, not WAV. I find that for these “voice only” tracks, MP3 works just fine. We are going to clean them and compress them in Audacity, so MP3 doesn’t lose any depth or fine detail in the dialogue track that we wouldn’t be taking out anyway. It is not like recording music or film dialogue – where we are striving to maintain as much depth, frequency, and reality as possible. This is RADIO. Monotone, evenly recorded voice.
If your pod hosting site requires WAV files for your finished project, then Audacity can build your podcast in WAV, using the MP3 files as sources.
The paid version of Zencastr is $18 to $20 per month, and makes sense if you are doing this commercially/professionally. Unlike the free version, it gives you the choice of MP3 along with WAV. Note that the pro version still provides you an MP3 set of files along with the WAV files (if you select WAV as a format). The pro version allows you a greater number of guests, greater usage time, “live” sound effects drop-ins (they call it soundboard), and some semi-automated post production.
But since we will be using Audacity to actually build our podcast in post, I do not see the value of being able to click on a button just to drop in a pre-recorded clip (onto its own timeline). Easy enough to do in editing! I have already discussed WAV, so the main advantage of the paid Zencastr version would be the larger number of guests (do you really use more than two simultaneous guests?) and more than 8 hours per month usage time. However, during the pandemic, Zencastr is offering unlimited guests & record time – so there you go!
After you have downloaded all of the individual track files of yourself and your guests, we need to build our podcast. For that, you want to have some good audio editing/mixing software. Pro Tools is what professionals use in the movie and music industries, but it does cost a bit and requires a lot of learning. Blackmagic DaVinci Resolve is similar to Pro Tools, but is free. However, there is still a steep learning curve. Adobe and Apple also offer professional grade audio editing software.
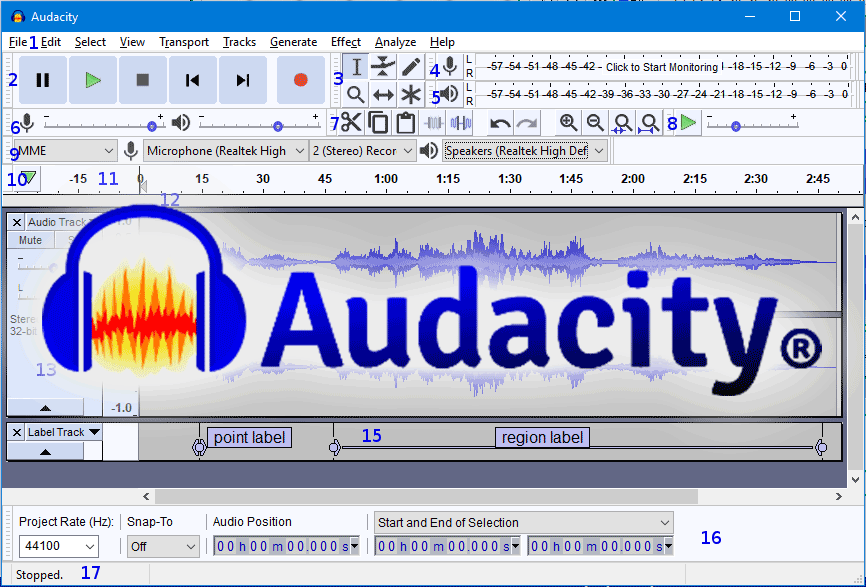
Audacity is free and (relatively) simple to learn. A 15 minute YouTube tutorial will get you up to speed, and there are lots of them out there.
What you will be doing in Audacity (or the program of your choice) is to create a project and set it for the desired recording specs (file format) that you need, such as MP3, WAV 16 bit/44.1k, or WAV 24 bit/48k. Note that your original MP3 files can usually be imported/converted to WAV, but always do a quick test to make sure that you are happy with the results; sometimes converting MP3 up to 24 bit/48k might be asking too much. If your podcast hosting site is willing to accept MP3 files, then keep it in that format.
Import your individual tracks into Audacity. They will be in sync until you begin editing. Your first chore is to de-noise them and eliminate some of the room tone or background ambiance.
Remember those few seconds of room tone? Select a few seconds of it. Go to the noise removal “effect” in Audacity and tell it to “learn” the noise. Then go back, select the entire track, and use the noise removal module to clean the recording. Repeat this two-step process with each individual track; remember that the room tone is different for each track, so you need to sample each track’s room tone.
Next step is to normalize them, again using the module under “effects”. That will adjust the peaks of your recordings for optimal volume.
Use the compress module to smooth out low and high volume in order to get a consistency. Just use the default settings in compress. Maybe re-visit normalize one more time.
Now you are ready to begin the actual editing of the tracks. Trim off the room tone, cut out the mistakes, slide some sections to adjust pacing & overlaps. Add new tracks with sound effects, music, introductions, closings.
Because you are editing audio only, you have total freedom to move things around and get creative on your timelines. Not like video, where everything has to remain in perfect, timecode sync.
The internet is full of tutorials on how to use the tools in Audacity to edit and mix.
Here are a couple of links to help you learn about the software:
https://www.youtube.com/watch?v=YUULn71_G74 How to use Audacity 2021
https://support.zencastr.com/en/articles/2775732-getting-started-with-zencastr
https://www.youtube.com/watch?v=U_-J-9s-76Y Zencastr Review & Tutorial