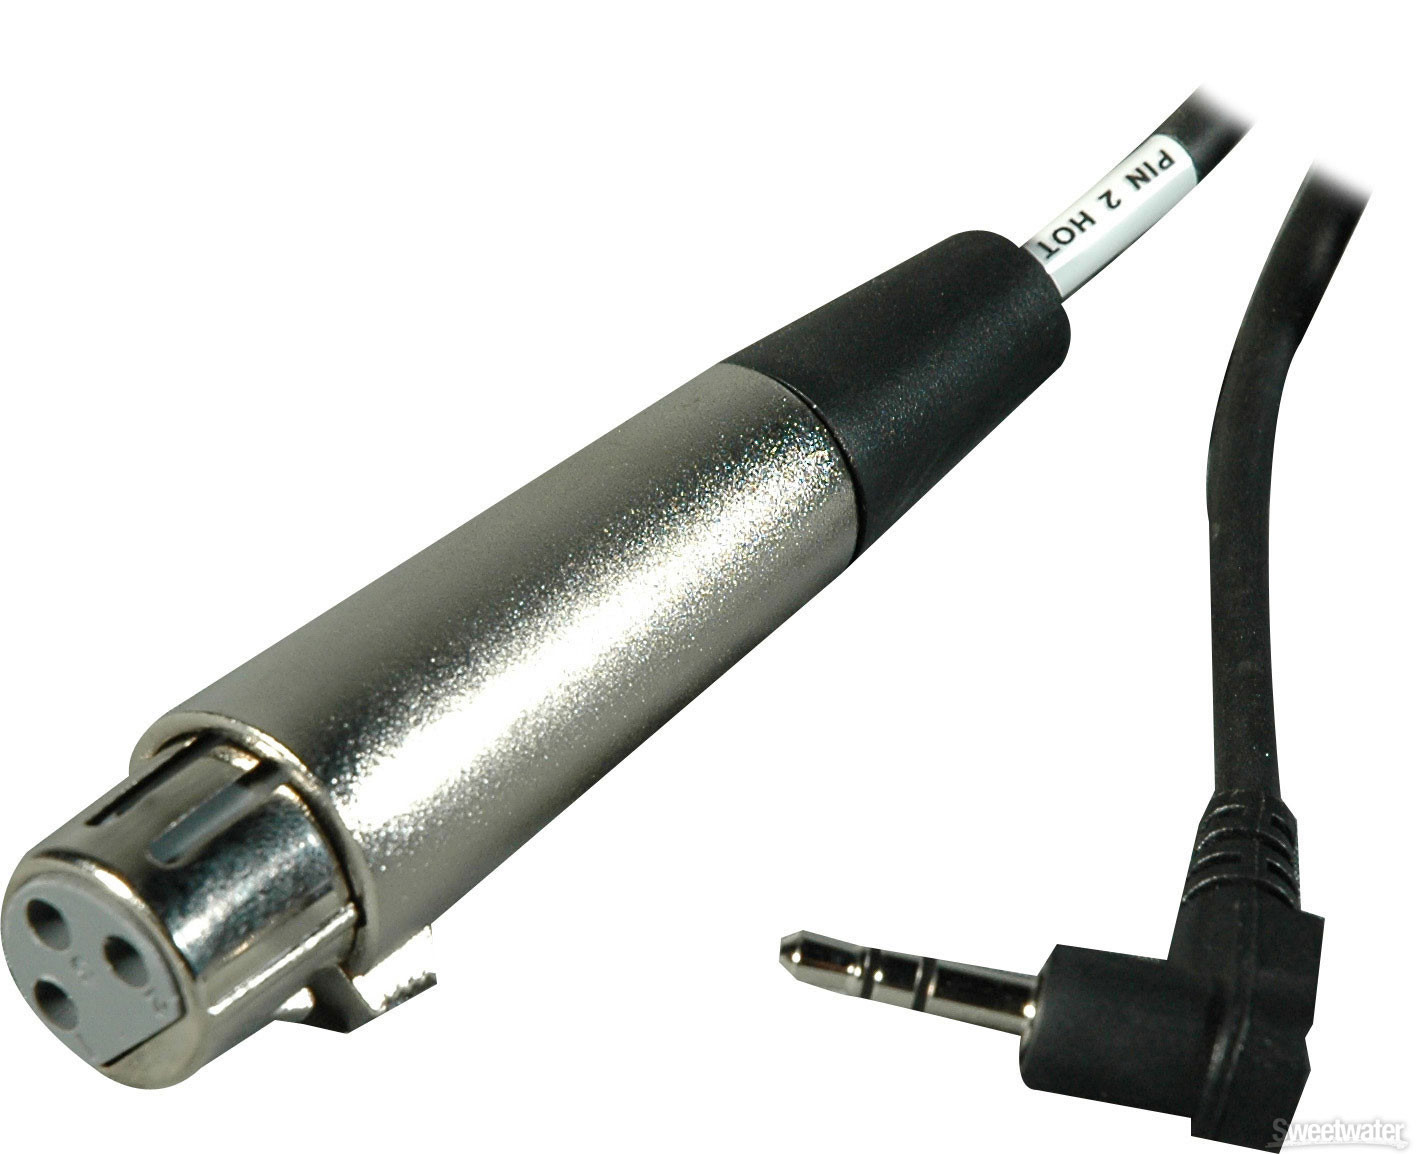
 The wiring of this basic adapter cable must be what is referred to in the industry as dual mono. What this means is that the main audio signal (pin 2 of the XLR connection, the audio POSITIVE signal) is routed to BOTH the tip and ring of the stereo mini plug. The tip and middle ring of the stereo mini plug represent the main (audio positive) signals for the Left and Right channels. Pin 3 of the XLR connector, which represents the negative audio signal) along with Pin 1 of the XLR connector (which represents the ground signal) are both wired to the remaining sleeve (lower shaft) of the stereo mini plug.
The effect of this dual mono wiring scheme is that the audio from the XLR input is distributed equally to the Left and Right channels.
In contrast, if you were to find an XLR to STEREO mini adapter that was traditionally wired so that Pin 2 of the XLR went to Tip, Pin 3 went to Ring, and Pin 1 went to Sleeve – the results would be disastrous. The output from the XLR (mic) would be halved, with each half going to Left or Right. However, the signal going to the Right channel would be out of phase with the Left Signal.
You might not notice it during live production in the headphones, but when you process the audio later on, you could have some very serious cancellation between the two tracks. (One solution would be to disconnect one channel in post so that it did not cancel or interfere with the remaining one.)
Visually, a conventional XLR to stereo mini cable looks identical to a dual mono version. You cannot tell one from the other without using an electronic cable checker or VOM meter. Therefore, it is extremely important that you know the source of the cable: never just grab one that was laying around. Be certain that it is designed for camcorder application!
What about the buzz?
Earlier in this article we mentioned those aftermarket microphones that the consumer manufacturers would so dearly like us to invest in. Most of those mics are of the electret condenser design, meaning that they need to see a few volts of DC power in order to function.
To power these mics, the camcorders produce three to six volts DC at the mic input jack. Even those camcorders that have a separate DC OUT micro jack alongside of the MIC INPUT jack, still root the DC circuit in the ground of the MIC jack. Unless your plug-in mic is of the precise electronic formula of the camera maker, you may experience symptoms of DC interference.
Depending on the particular characteristics of your pro mic, these DC related symptoms may include: non-existent audio; a significant loss of gain/volume; buzz/hum; or even intermittently increasing buzz/hum. If you barely jiggle the stereo mini connector, you may even hear sharp crackling, as if there was a broken wire. Different types of mics react differently.
To eliminate this buzz problem, the upstream DC voltage must be blocked by means of capacitors. Choose your capacitors wisely, for too little will not cure the buzz, and too much will affect the mic signal.
There are a few companies that manufacture custom adapter cables with internal capacitors, but not many. If you ask your local supplier and they are not sure whether or not their adapter cables are of this special variety, chances are that they are not.
Bear in mind that not every camcorder requires the DC blocking. Earlier Sony cameras were notorious for DC issues, but Panasonic and JVC were generally okay. Canon cameras varied; some needed the DC blocking and some did not. The newer Sony cameras seem to be okay and no longer require the DC blocking.
But if you are not sure, or will not have an opportunity to test the connections, then having an adapter with DC blocking cannot hurt. There is no downside, other than price, for using a deluxe adapter cable with the DC blocking with all the cameras.
Street prices for simple, dual mono adapter cables range from $15 to $50. Price will vary depending on quality. Deluxe cables with DC blocking may cost from $60 to $100.
Tips on Using the XLR to stereo mini adapter cable
The basic XLR-DV cable is a short adapter that features one female XLR 3-pin connector at one end and a right angled mini stereo plug at the other. It is wired dual mono so that audio is distributed properly over the left and right camcorder channels.
Deluxe versions of this cable feature blocking capacitors housed inside of the shell of the XLR knock out the DC interference.
We recommend slipping a rubber band around the mini connector and pulling it around the camera body like an oxygen mask, thus applying inward tension on the connector. The XLR connector of the cable should be strain relieved by tying or taping it to something sturdy on the camera body, such as the strap lug.
Never allow any long cables or any weight to tug directly on the mini jack of the camcorder; the jack is fragile and can loosen or damage easily. For that reason, we do not recommend purchasing an adapter cable longer than what it takes to reach the camera mounted shotgun mic or just the wrist strap (if you are using audio from a mixer or boompole).
Make sure that the XLR input of the adapter cable is secure, and that there is minimal tugging on the delicate stereo mini connection.
If you need to feed audio via a longer cable, then use a regular XLR to XLR mic cable, and plug it in to the XLR input of the adapter. But do not make the mistake of trying to use a real long adapter cable!
Audio Adapter Boxes
For many people, the better choice would be to use an Audio Adapter Box rather than a simple adapter cable. Audio Adapter Boxes usually mount securely under the camera body, although some models offer a belt clip and extender cable so that the box can ride on the camera operator’s belt.
I find that affixing the box underneath the camera is fine when you are tripod mounted, or when the shotgun mic is riding atop the camera ENG style.
Should you go handheld with the camera, and taking an external audio feed, it is better to secure the adapter box to your belt. That way, any tugging on the mic cables are absorbed by your torso rather than jerking against the camera.
Another advantage of adapter boxes is that they offer more flexibility of inputs. Most boxes have two XLR inputs, and either one can be switched for mic level or line level input. In addition to the switches, each input has a volume control that can lower the incoming volume (but not raise it). Some boxes also offer a choice of grounding modes, so that they can be used with a variety of cameras. All of the boxes that we have tested feature some sort of DC blocking, either capacitors or transformers.
There are some more elaborate adapter boxes on the market that even feature microphone pre-amps similar to a mixing panel. These pre-amps allow you to raise the volume as well as lower it. Some even provide remote Phantom power for condenser mics, and visual metering of audio levels.
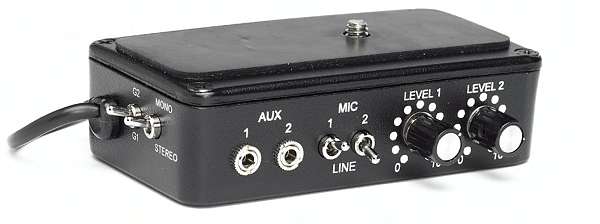 The Sign Video model XLR-PRO, is an adapter box that mounts beneath the camera body. It features two XLR inputs for mic/line, mono/stereo, selectable ground, and volume controls. A belt clip and extension cable are included, so that you have the option of either wearing the adapter or mounting it to the tripod leg. Price is around $160.
BeachTek makes a whole lineup of XLR box that fasten underneath most camcorders and provides two XLR mic/line inputs, volume controls, and output is a stereo mini plug that connects to the mic input jack of the camcorder. Prices start around $179 for the basic models. They offer different configurations (sizes) for a variety of cameras.
BeachTek also offer deluxe models such as the DXA6 which features 48volt Phantom powering for condenser mics. And their DXA8 has actual mic pre-amps that allow you to RAISE mic volume.
Studio One is yet another manufacturer of adapter boxes, most of which are intended to be belt worn. They even offer boxes with three XLR inputs.
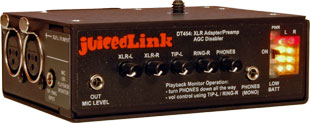 JuicedLink makes some sophisticated two and four input boxes that are essentially small mixers. They are a newer player in the game, and address the needs of cameras that appear to have been designed with all attention given over to picture quality and very little attention to audio.
Whirlwind Audio also offers a nice, inexpensive adapter box that uses Neutrik Speak-On connectors that accept ¼-inch as well as XLR inputs. However, you do need to supply your own min to mini adapter cable to go from the box to your recording device.