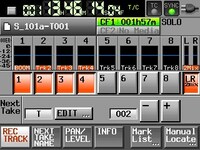
 A common mistake when using a multi-track field recorder is to only arm the exact number of tracks that you need. Although this may work out fine if you are only recording one session on one day, it can create chaos on a film shot over several days.
In the dayes of olde, when memory cards were small in capacity but large in pirce -- it might have made sense to try and conserve. But these days, a professional sound mixer is not worried about wasting a little bit of memory. Just a few minutes of 4k video will use up more memory than the entire shoot's worth of audio!
Instead, the sound mixer should think in terms of the post production workflow. If you only arm and record the exact number of tracks that you may need at the moment, you will end up turning in files that will vary from scene to scene, and from day to day. Imagine how chaotic it will get if the lab and the editors have to guess how many tracks are supposed to be in each take -- and then the additional confusion of integrating them all on a timeline that spans numerous picture and audio clips representing different scenes, angles, takes, and shooting days.
It would be much easier on every body if ALL of your takes contained the same number of tracks, even if some of those tracks were muted or empty. There would be no second guessing of how many tracks were supposed to show up in the transfers. There would be no issues or need to re-locate a few tracks amongst a greater number of project tracks.
If your multi-track recorder is capable of recording two master tracks and eight ISO's, then always turn in dailies with two master tracks and eight ISO's, even if some of thsoe ISO tracks are empty.
Using more tracks also allows the sound mixer to maintain a consistency of track assignments. The editors would quickly learn where to find the ISO for any given boom or cast member. Say, for example, that in the first scene we record the boom onto track1, second boom onto track 2, Joe's radio mic onto track 3, Mary's radio mic onto track 4, and Mark's mic onto track 5. During coverage of Joe, Mary's and Mark's tracks will be muted/empty. When we go in to cover Mary, Joe's and Mark's tracks may be empty. The next day, Mark may not be on the call sheet, so his track may remain empty. Day after, Mark is back but Mary may not have any scenes in the morning.
Later, when it comes time for the editors to intercut all this footage -- they will know that each cast member can normally be found on the same number track throughout the shoot, so locating ISO coverage is easy.
True, once in a while, you will need to use an "empty" track for a new character or something, since you are limited in the number of tracks at your disposal -- and that is okay. Just be sure to clearly call attention to the new use of "someone's track" on your sound report!
Try not to ripple or re-assign characters from one track to another, if you can help it. Consistency means a lot to an editor and makes their job so much easier.
As for what to do with your two master tracks, I recommend recording dual attenuated mono "live mixdowns". The left master track (or however your recorder designates the master track) should be the mixed program output from your mixing panel.
That track should represent your best "live mix" of booms, planted mics, and lavs. It will also be the audio sent direct to video as a scratch track for playing back takes on the set. Your production mix will be used during picture edit before being sent off, along with your eight ISO tracks, to the sound editing team.
The Right track, or second master track, will be an attenuated version of the main track. The only difference being that all of the fader output will be recorded at ten or fifteen decibels lower on that second track. This is easy to accomplish by simply panning the output of each of your individual input channels slightly more to the left than to the right. If you have a problem actor who tends to speak at low volume, and then sometimes even lower -- try panning that actor's mic towards the right, so as to boost the gain/volume on your second master track.
During picture edit, if audio clipping occurs on the main "live mix" production track, it is a quick fix for the editor to just drop down to the second master track and use part of that attenuated section instead. If the editor chose to use the ISO to fix the problem, then it becomes necessary to do a lot of reconstruction in order to match tonal quality, perspective, ambiance, production sound effects, and any overlapping dialog from other characters.
Another mistake often made by newbies is to keep repeating themselves on the sound reports. If you are using handwritten reports, you do not need to keep copying all of the ISO track information on every take. Nor do you need to squeeze everything into the itty bitty space alloted by one line per take. Feel free to write vertically down several takes! Draw arrows to indicate the same track info. You only need to write new info on a take line if you have made changes to your track assignments!