 Note: This article by Fred Ginsburg was originally written for and published in the 2015 Anniversary & NAB issue of Student Filmmakers Magazine.

The answer to the questions, “How loud should my dialogue be recorded? What should it read on the meter?” depends mostly on what type of meter you are looking at.
Essentially, there are three types of professional audio meters that you are likely to encounter, not counting the cryptic “idiot meters” filled with random symbols that often take up space in video viewfinders. (More about these “idiot” meters later in the article.)
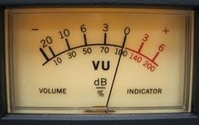
The most common form of audio meter is the popular V.U. Meter. The Volume Units meter dates its origin back to the earliest days of broadcasting. The underlying concept was to measure (the signal voltage) of a radio announcer speaking with a monotone voice. In those days, boring was better; and announcers were always restrained and as non-wavering as they could achieve.
The V.U meter measured the AVERAGE loudness of their performance. Zero was deemed as the optimum averaged loudness for radio transmission. An announcer could sporadically raise their performance to peak up to +10dB and still just barely stay within the broadcast parameters of the time. Or, they could lower their voice by around the same amount from time to time, without driving the engineers into frenzy.
And so, for decades to follow, the V.U. standard continued to be used on mixing consoles and audio recorders. Zero V.U. still represented the optimum AVERAGE loudness for normal voice levels, allowing for peaks up to +10dB without horrific distortion or overload.
When using a V.U. meter, the goal is to record normal dialogue as close to zero as you can; only exceeding zero now and then in order to accommodate brief loud outbursts (shouts, screams). Any prolonged loud outbursts should only hover only slightly above zero (such as +3 or so).
Although your peaks can hit up to +10dB, your AVERAGE should not register more than just a few dB hot.
Think of a V.U. Meter like a photographic meter that measures the average grayscale of a scene. It is calibrated to assume that there will be some brighter highlights along with some deeper shadows.
During the later decades of the twentieth century, professional audio engineers realized that they needed to pay more attention to the peaks of a recording than the “middle gray” portion. It was the peaks that went into distortion if they were recorded too hot, so that was the part of the signal that required stringent monitoring.
Professionals began using modulometers to measure peak recording levels (also called “peak meters”). The venerable Nagra reel to reel tape recorders were renowned for their highly reliable metering system, which used state of the art modulometers to determine audio levels.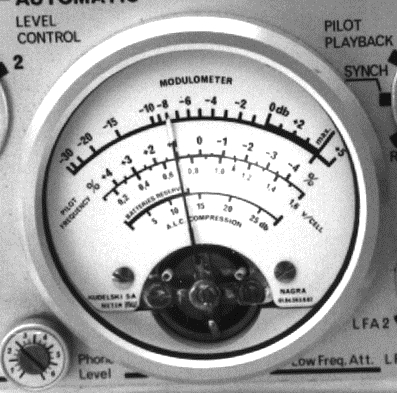
On the Nagra, peak audio levels were supposed to stay below the zero mark. Zero now represented the loudest that audio could be recorded without risk of over modulation. Normal dialogue levels were expected to hover around negative 8dB or negative 10db. Only the loudest outbursts were supposed to approach zero.
In reality, though, one could record loud outbursts a few dB over zero, because distortion in an analogue signal is gradual, and the clipping is only minor within a few dB exceeding the zero mark.
Think of the difference between thermometers calibrated in Fahrenheit compared to Celsius. Water freezes at 32 degrees F, but at zero degrees C. The boiling point is 212 degrees F, but 100 degrees C.
Audio distortion (theoretically) occurs around +8 or +10 on a V.U. meter; but at 0dB on a peak reading meter (modulometer).
If we subtract 10dB of headroom to allow for the difference in volume between normal conversation and a shout, then our normal (middle gray) dialogue level would be zero on the V.U. meter, but -8dB or -10dB on the peak meter.
Because dialogue does not respond to metering the same way a simple frequency tone would, most audio engineers felt that 8dB was a more realistic value than 10dB. Hence, the reference tone on all but the earliest generation Nagra tape recorders was set to -8dB (the equivalent of zero on a V.U. meter).
Enter the digital age.
Unlike analog recording, where the ill effects of over modulation increase gradually — in a digital signal, there is no forgiveness. Either you are a fraction below zero, and your recording is perfect; or you are a fraction hot, and you suffer major clipping.
On the other hand, examine what happens if you record too low. On the analog track, our recording begins to get buried amongst tape hiss and electronic system noise. Not good. We strive to record as loud as we can, without going over, in order to achieve the best signal to noise ratio and the cleanest recording.
 In digital, we are not nearly as worried about recording at lower levels. Tape hiss and system noise are no longer threats. We are, however, paranoid about exceeding our allotted headroom and going past the zero mark. Therefore, we record 10dB lower than we normally would for analog.
That means, for proper digital audio, we want our conversational dialogue level to be around -20dB. That allows us lots of headroom in case of loud outbursts, while still keeping us under the zero mark.
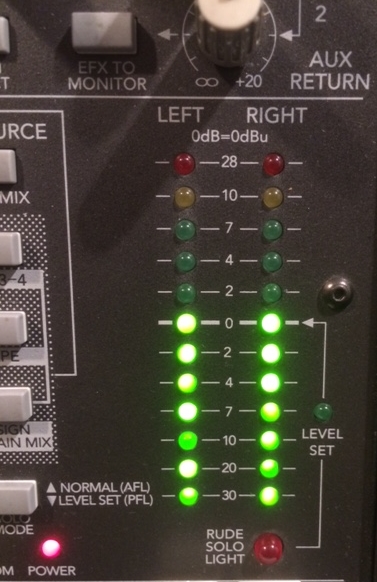 Many popular mixing panels, such as Mackie and Behringer, still use what is essentially a V.U. style meter. Some other popular ENG mixers also use sort of a hybrid metering system, which is still closer to the V.U. concept, where zero represents the loudest that you want to keep dialogue averages at.
Therefore, you want to set your levels so that zero on your mixer corresponds to -20dB on your recorder. Turn on your tone generator, and set it so that the tone registers at zero on the mixer and negative 20dB on the recorder (and always record at least thirty seconds of reference tone at the beginning of every session).
Which brings us back to the notion of “idiot meters”. Many manufacturers of consumer camcorders feared that camera operators were too stupid to understand the difference between the old style V.U. meters versus the modern digital meters. True, they could have just stressed that in the instruction manual, and maybe even managed some meaningful color coding — but instead, they chose to make things even more confusing.
Sometimes they just reverted to using analog V.U. metering in their digital recorders. Other times, they just shifted the numbers around so that -10dB represented -20dB. In some cases, they just avoided numbers all together and just presented a bunch of random symbols like circles, squares, diamonds, or triangles.
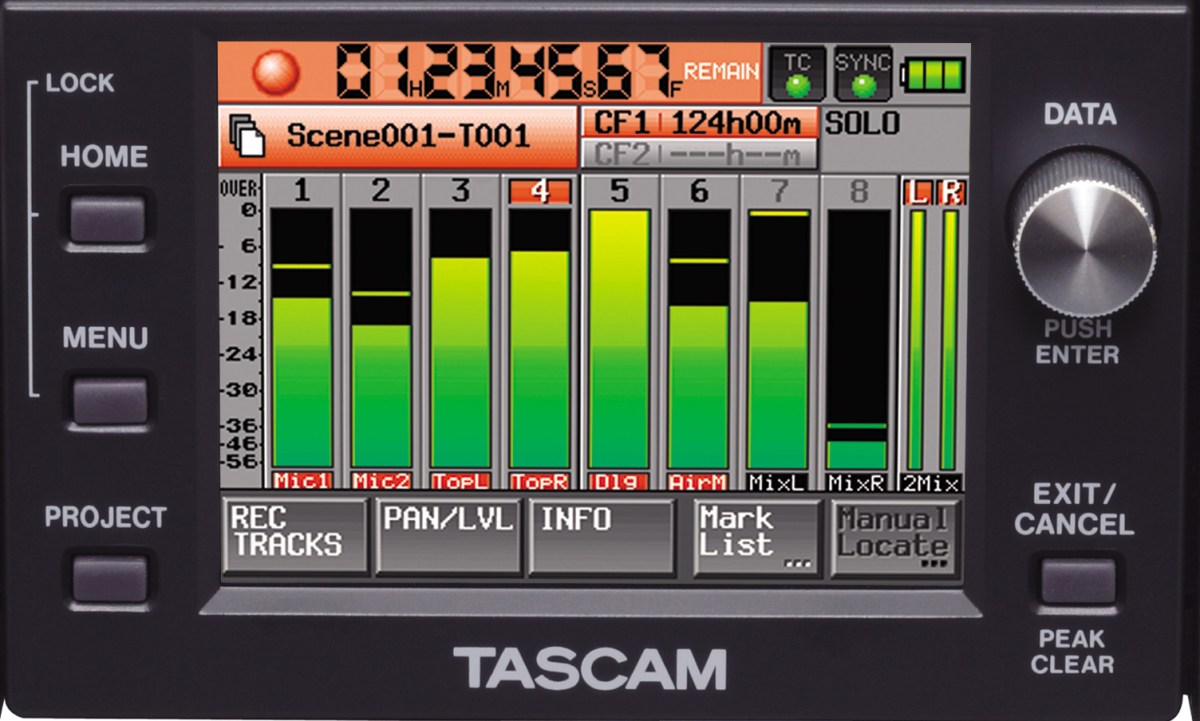
Bottom line. If you are shooting with a highly professional camcorder, it is probably calibrated with a proper digital scale and you can trust the numbers.
However, if your camcorder cost less than a new luxury car — you need to be cautious. If time allows it, record some audio tests at different levels. Set dialogue as you normally would on your mixing panel, but record it on the camera at a variety of levels at 5dB increments. Make sure that your audio test includes normal speech, some shouts, and some whispers. Transfer the video to an edit system if you can, or at least to a good stage monitor — and determine the best setting for your particular camera. Zero on your mixer might sound best at zero, -10, -12, -20, or ???
If you have to set up in a hurry, and there is no time for proper record/playback tests — then try this field solution.
Set the camcorder to automatic level control for audio. Understand that we normally avoid using automatic level control because it cannot differentiate between normal conversation, shouts, whispers, or dramatic pauses. The auto system raises or lowers the gain so that any incoming sound gets recorded at the same level. Which is good for conversational dialog, but bad for anything loud, soft, or silent (unless you love very boosted room tone). When the actor changes voice level, then the system often over reacts and the gain acts like a bungee cord, violently bouncing up or down as it adjusts to the new status quo.
Give the auto level control what it was designed to hear, and it is happy. Therefore, feed the camcorder some nice, monotone dialogue — being careful to avoid any loud outbursts, soft passages, or long pauses. If the automatic system does not encounter any surprises, it will do its designed job and record sound at an acceptable level.
Watch the meter and see where the auto system thinks that good dialogue should be. The meter will always be in motion, so get a sense of where the spread falls.
Disengage the auto level control, and manually dial in the gain on the camcorder so that your (still monotone) dialogue spans around the same range on the meter. Now that you are back in manual model, any loud outbursts will register as hot, and softer passages will register as lower. Quiet pauses will barely register at all.
One final comment. When you record dialogue, don’t worry too much about specific numbers on the scale. Pure tone goes to a number and stays put. But human voice is always in swing, and the needle is always swaying back and forth. Think in terms of recording ZONES instead. Set your levels so that you divide your scale into three zones: way too hot, way too quiet, and “in the ballpark”. Always monitor sound through a good pair of headphones, and learn to trust what you hear.