![]() This article not only details the operation of the Sign Video ENG44 portable mixer, but also explains many generic concepts about using mixers for video.
This article not only details the operation of the Sign Video ENG44 portable mixer, but also explains many generic concepts about using mixers for video.
A PDF downloadable version is available in the Users Manuals section.
 When Sign Video first introduced their portable, over-the-shoulder ENG style mixer, the entire industry was taken by storm. FInally, the financially constrained indy now had access to a full featured, quiet, and properly designed mixer that they could actually afford to own!
However, it soon became apparent that this mixer was going to have a lot of appeal to videographers and sound novices who were not experienced with using mixers.
Hence, the need for a tutorial such as this one, which I originally wrote as an introductory guide for my own clients and students. It not only takes you button by button through the operation of the ENG44, but explains a lot of audio basics along the way.
Batteries
The ENG 44, created by Sign Video, operates from four AA alkaline batteries. Typical battery life is at least a "working day" or more, depending on how much Phantom power your mics draw. The manufacturer quotes 8 to 14 hours of constant usage per full set.
In actuality, you may find that the unit runs even longer, due to real life field variables. For instance, during a real working day, it is normal to turn the mixer off for periods of time in between set-ups. Also, your condenser mics may consume less power than other mics. Or, you may not be using Phantom power at all.
To load batteries, just squeeze the catches, located on either side of the battery door, together and pull the drawer out. Insert four AA alkaline batteries, and re-insert the drawer. It is also possible to utilize rechargeable AA batteries. If you are going to use rechargeables, purchase large capacity batteries of at least 2300ma (2500ma are even better). Note that the ENG 44, when plugged into the AC adapter, does NOT RECHARGE these reusable batteries!
You can also ask your dealer about purchasing an extra battery tray, so that you can keep an instant reload ready to go.
When you power up the unit, the red battery indicator LED will light up. When that LED begins to flash, it means that you should replace your batteries as soon as you get the chance.
Some users have reported that their units continue to operate up to an hour while flashing. Again, it all depends on how much power your mics are drawing.
Powering Up
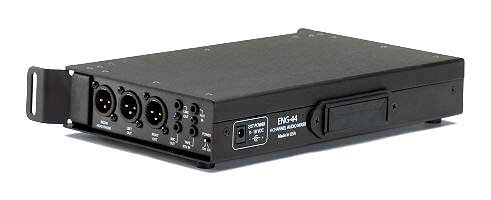 The On/Off switch is located on the right side (output side) of the mixer, towards the back. When you power up, the red LEDs on the face of the unit will indicate battery or external power source. You can operate the ENG 44 from AC by plugging in the 12v power adapter that comes with the unit.
XLR Inputs
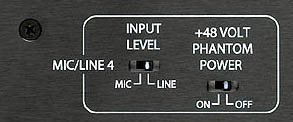
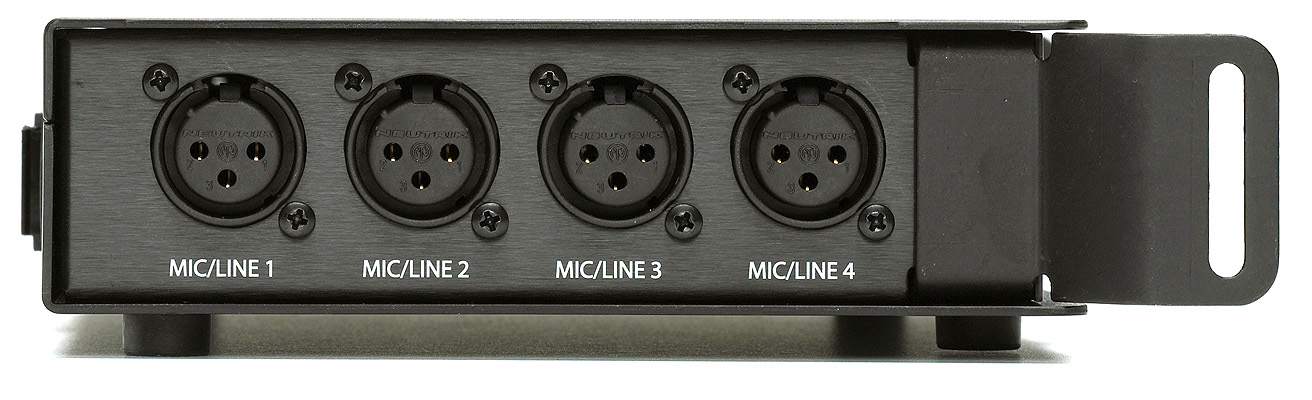 There are four balanced XLR MIC/LINE inputs on the left side (input side) of the mixer. (Although earlier units were labeled as Mic 1 thru Mic 4, in actuality these inputs are switchable for either MIC LEVEL or LINE LEVEL inputs. The term "Mic" was used informally to differentiate inputs from outputs.)
On the bottom of the mixer are four sets of sliding switches. They allow you to set each input for either mic or line, and to activate 48volt Phantom power for each mic. (Use the tip of a paper clip or the point of a pen to move the recessed sliding switches.)
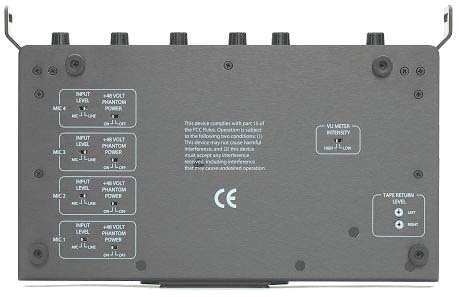 Keep the Phantom switch turned OFF except when you specifically need it to power condenser mics. Although the presence of Phantom power will not interfere with normal audio signals, it could increase the drain on your batteries and may have a long-term effect on some input devices (rare, but it has been known to happen).
In case you ever get confused about XLR inputs and outputs, always remember that the connectors mimic basic biology. Audio signals always flow out of the male pins and into the female openings. So the XLR connector with pins is an OUTPUT. The XLR connector with the 3 holes is an INPUT.
For example, the bottom of your microphone is always an XLR male, since the signal goes out of the mic to whatever the mic is plugged into. The end of your mic cable that connects to the mic will always be a female, since the MIC output travels to an input. At the far end of that same mic cable will be another male connector. The signal exits the cable via the male, and then plugs into the female XLR of your mixer or recorder. Always, out of the male, into the female.
 Another common area of confusion for some folks is the difference between MIC LEVEL and LINE LEVEL. Mic level is a very faint signal, generated by the basic components of a microphone. Line level, on the other hand, is a relatively stronger signal that has been amplified by the active electronics of a mixing panel or playback device (such as a tape deck, CD/DVD player, etc.)
There is approximately 55dB difference in gain (volume) between mic level and line level. Think in terms of two light bulbs, one is 12v and the other is 117v. If you send 117v of electricity into the 12v bulb, it will glow super bright (and will burnout). On the other hand, if you send only 12v to the 117v bulb, it will barely glow.
It is kind of like that with audio. If you send a powerful LINE OUTPUT signal into a MIC INPUT, the resulting audio will be very loud and distorted. If you send a weak MIC OUTPUT into a LINE INPUT, the audio will be very low and almost inaudible.
So the key is to match MIC to MIC and LINE to LINE. When plugging your mics into a mixer or camcorder, always select the MIC LEVEL INPUT. However, if you are taking a feed from a house mixing board (or PA system), or from a playback deck – then you want to select LINE LEVEL INPUT.
It is okay on the ENG 44 to use some of your inputs for mics, while simultaneously using your remaining inputs for LINE. That is why each input is individually switchable.
One more note. You purchased a mixer in order to get good audio. So use some good mics with it.
In my personal experience, I have found that trying to stick XLR adapters (and certainly never a daisy chain of multiple adapters) onto consumer grade, unbalanced (1/4-inch or mini-plug) mics is never a wise idea. Sometimes it will work but, more often than not, the results will be pretty disappointing due to a myriad of electronic reasons (such as impedance, grounding, polarity, and the fact that they are cheap mics to begin with).
Controlling the Input Levels
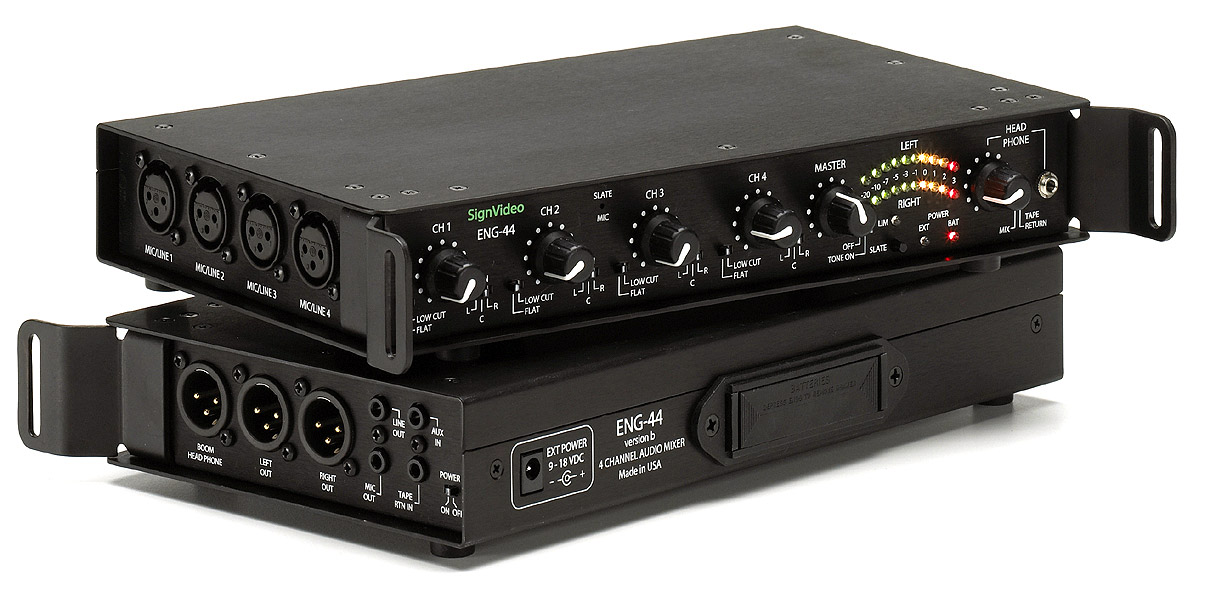
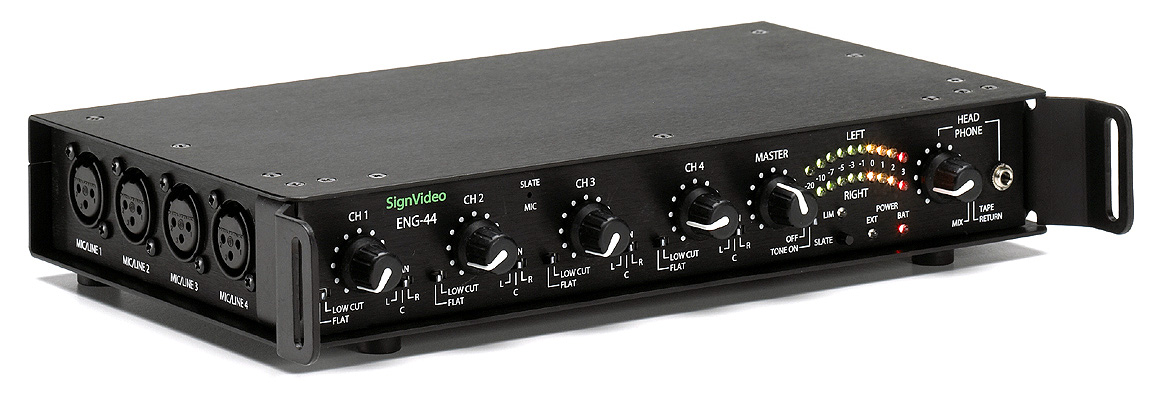 On the main face of the mixing panel are four knobs (the correct term is pot or potentiometer), designated as CH 1 thru CH 4. This is where you control the volume or gain of each input.
To the right of the four volume controls is the MASTER volume control. The individual volume controls work in tandem with the Master control to give you the total output volume. It is sort of like arithmetic: 3 x 4 = 12, but so does 6 x 2 = 12.
Read the total output gain (volume) on the LED meter display. Avoid going higher than zero. Personally, I would keep conversational dialogue averaging around minus 5, and try to only hit zero on loud outbursts.
A built-in LIMITER will kick in (the LED will light up) when you get way too loud. Limiters act like a pressure valve and prevent the audio from distorting in the mixer. However, some camcorders are more sensitive than others when it comes to hot signals, and may still show signs of distortion or clipping even if the signal stays within industry guidelines. So pay attention to your meter!
Is it better to raise the mic volume and use less master gain, or the other way around? Most of the time, I prefer to keep the pots sort of in the middle, because it is easier for me to physically adjust the knobs up or down during a scene if I am not at either extreme end of the turning range. Technically though, the design engineer of the ENG 44 does say that the quietest results would come from turning the mic levels up so that the master gain is turned somewhat down.
Rolling off the low frequencies
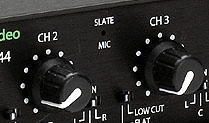
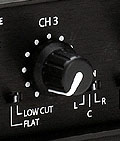 To the lower left of each knob is a switch indicating FLAT or LOW CUT. FLAT means that the mixer is NOT filtering out any of the low frequencies. LOW CUT means that the mixer is rolling off (reducing) the extreme bass frequencies of the incoming signal.
When listening to music, a lot of bass may be desirable. But when recording audio for film & video, excess low frequencies are the result of ambient noise such as wind and rumble. The excess bass tends to clutter up the soundtrack and makes it hard to understand the dialogue. It is standard practice in Hollywood to filter out the extreme low frequencies when recording voice; but to leave them in for music and special sound effects.
Generally, use the FLAT setting when recording indoors, unless there is background motor hum or air conditioning noise. Outdoors, it is usually better to engage the low cut filter.
Consistency is very important. Use the same filter settings routinely; do not "sometimes" use them and "sometimes not" or else you will find it difficult to intercut your angles later on. You would not want some of your interior shots to be flat (full bass response) at the same time that some matching interior angles had reduced bass. Even if the voices of the actors were not too objectionably different, the room tones and ambiance would certainly change considerably from scene clip to scene clip.
Some users opt to just always leave the low cut switch active, since it is very subtle and sounds okay even for indoor shots.
Pan
To the lower right of each input control knob is the PAN selector. PAN is similar to the left/right balance control of your home stereo system. It assigns each incoming signal to the left or right output.
But unlike the completely variable balance setting on your home system, note that the ENG 44 mixer only offers three specific choices: left, right, or center. You cannot assign a mic to be "slightly" to the left of center, nor "slightly" to the right of center! And that is how a location mixer should be.
Stop thinking of the two audio tracks in your camera as representing left ear and right ear. Instead, consider both of them as two mailboxes for storage of DIFFERENT information. As an editor, you do not want the same content to overlap two recording channels, because you want the option of manipulating the content of each track independently.
Say, for example, that you are interviewing two people. Person 1 and Person 2 are both on lavaliers, and you mix them so that both voices appear on both camera tracks. If one person fiddles with their mic while the other person is speaking, you will have mic noise under the dialogue. But if the two subjects are recorded on separate tracks while filming, then the editor could easily mute the noisy track without affecting the good track.
Later on, during the editing process, either track can be mixed with the other in any creative proportion, or "panned" to any stereo position whatsoever.
That is why there are only three options on a professional field mixer. Left track (with no overlap onto the right track); Right track (with no overlap onto the left track); or Center (essentially Monaural, with all sound going equally to Left/Right).
Tone and Slate
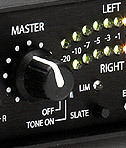 Located just to the right of the Master Gain control is the Tone switch. To activate the internal Tone Generator, just slide the tone control switch from OFF to TONE ON. An industry standard 1khz test tone will be output. You can raise or lower the output level by adjusting the Master knob.
Normally, we like to output the tone at zero level on the meter. Zero represents the loud threshold of dialogue. Then adjust the input level of your camcorder or audio recorder so that the incoming tone corresponds to the appropriate recording level for your device.
For example, on my Panasonic camcorder, I have found that zero tone from the mixer should line up at minus 10 on the camera. Why a minus 10? Because different meters are calibrated in different scales, sometimes for digital and sometimes for analog, and sometimes somewhere in the middle because the manufacturers don’t trust the end-users.
However, when I record to my digital audio recorder, I align the mixer’s zero tone to minus 18 on the audio recorder! That is because the metering on the audio recorder is set up to professional standards.
So how to know what settings are best? Experiment! Record stuff and play it back on your editing system. See if whispers are still audible and if shouts don’t distort too badly.
If you don’t have an opportunity to conduct record/playback tests, here is a useful trick. Set the audio input control of your camera to Automatic Gain Control (it might be a switch or it might be a menu setting). Have someone speak gently into a mic, adjust the meter level on the mixer to where you would normally have it, and then monitor the camera. See where the camera automatically sets its own volume for the dialog.
Reset the camera to Manual audio level, and adjust the camera’s input control so that your dialogue is at the same (camera) level as it was during Automatic.
By keeping the camera in Manual, you will not suffer a "pumping" of the audio level should your dialogue vary in performance or contain dramatic pauses. Automatic level controls are notorious for suddenly raising the level of background noise during silent passages, and then reacting frantic when someone resumes speaking.
Thirty seconds of zero tone from the mixer should be recorded at the beginning of each videotape (along with color bars). Indicate on your log sheet (or on the tape label) what the level of the audio tone on the "video" represents (e.g. "minus ten," etc.).
In addition to recording tone at the beginning of the tape, it is often convenient to punctuate the end of a take with two beeps. It makes it easier for the editor to separate audio takes.
 The Slate Mic is your personal mic. At the beginning of every tape, record the pertinent production information to identify that tape for the editor. Roll number, production title/number, date, audio speed or sampling rate, time code frame rate, and what audio level the tone represents.
During the production, you can i.d. the scene and take number at the beginning of each take. While the recorder is OFF, you can also speak instructions to the boom operator.
VU Meter
 The "VU" meter on the ENG44 mixer is technically a peak reading meter and indicates the output level of the audio. Think of zero as the loudest part of dialogue, comparable to a hard laugh or continuous shout. Normal conversation should average down around the minus five range. Dialogue is not like continuous tone that stays constant; dialogue will bounce around considerably. Divide the LED range into four zones: very low, medium, zero, and distorted. Whispers may just barely get the LED's to move. Normal dialogue is in the minus 7 thru minus 3 range (most of the time, but not continuously). Loud dialogue will peg at zero, sometimes going even hotter for a brief instant, and then returning to zero or under. Try not to allow the audio to linger past zero continuously.
Note that these peak meter readings are for the MIXER. At the camera or recorder end, you will adjust the input level to whatever is appropriate for that particular and specific device. For instance, on my Panasonic camcorder I set zero from the mixer to minus ten on the camera. But on my Fostex digital audio recorder, I set zero from the mixer to minus eighteen.
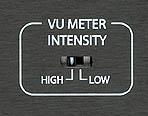 On the underside of the mixer is a switch that allows you to set the brightness level of the LED for your surroundings. Use the weak setting indoors or at night; and use the bright setting for visibility in sunlight. Note that the use of bright metering will increase your battery drain.
Don't forget to "calibrate" your headphone listening level to the VU meter. To do this, turn on the TONE at zero level, and then gradually increase the volume of your headset until the tone sounds just annoyingly loud. Not rock concert loud. More like getting chewed out over the telephone kind of loud. Remember that zero level represents the loud part of dialogue.
So normal dialogue should sound pleasing and comfortable in your phones. Whispers will cause you to automatically raise the input volume; and loud raging will trigger you to turn the mic down! With just a little practice and experience, you will hardly need to watch the LED display at all -- thus freeing you to watch the ACTORS and the BOOM MIC instead.
Output connectors
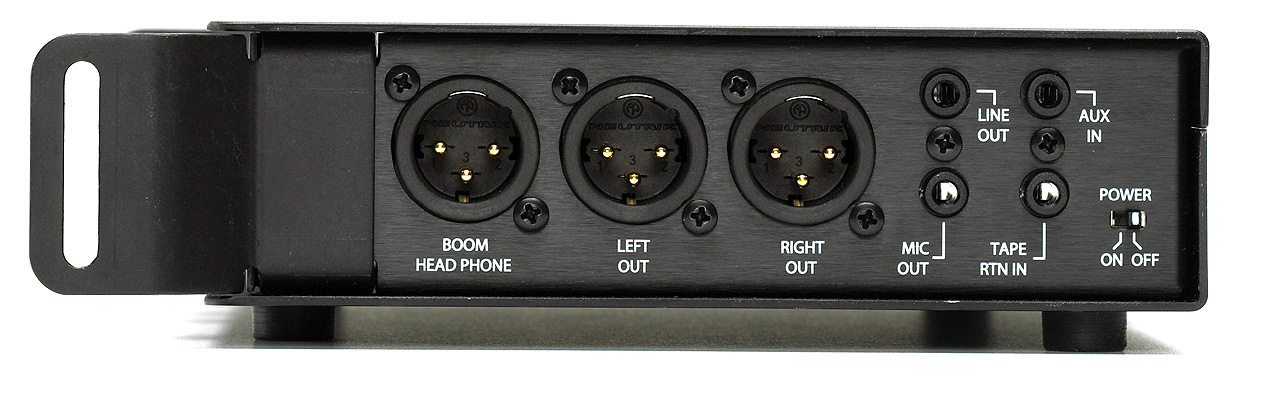 The main outputs of the ENG 44 mixer are XLR type connections, at LINE/MIC LEVEL output. The majority of professional cameras and recorders will accept LINE LEVEL inputs. We prefer to send LINE LEVEL rather than MIC LEVEL signals, because the LINE levels are much stronger (louder) and less prone to electronic or radio wave interference. If your recording device only has RCA line level inputs, then you should purchase "RCA plug to XLR female" adapter cables to use at the recorder end.
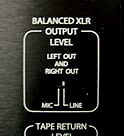 If you connect the XLR line level outputs to XLR MIC LEVEL inputs by mistake, the audio will be extremely loud and distorted! If you need to connect to a MIC LEVEL input, then use the MIC/LINE switch on the bottom of the mixer to select MIC LEVEL output for the main XLR's.
In addition to the XLR outputs, there are four stereo mini (also called "3.5mm stereo") jacks. These jacks are: MIC OUT, LINE OUT, AUX IN, and TAPE RETURN IN. The MIC OUT and LINE OUT offer another way to take your audio signal out of the mixer.
Some consumer camcorders and pocket audio recorders only have stereo mini MIC inputs. Just use a stereo mini to stereo mini adapter cable and you are set.
The LINE OUT jack can be used to feed a pocket recorder that accepts LINE level input. If your pocket recorder offers a choice of LINE or MIC, then use LINE LEVEL since it is less vulnerable to interference.
AUX IN is a LINE INPUT for daisy chaining two mixers together so that you have eight inputs. Connect the LINE OUT jack to the AUX IN. You do not have level control over the AUX IN, so you must adjust the output level of the other mixer to balance nicely with the audio levels of the your mixer.
TAPE RETURN is for taking a headphone feed from the recorder and bringing it back to the mixer. A switch near the headphone volume control allows you to monitor either your mixer or the recorder. You can adjust the relative listening level of the return headphone feed with the controls on the underside of the mixer. Set the return level so that it matches closely to the "mixer" level, as you select back and forth.
Mic Boom Operator's Headphone
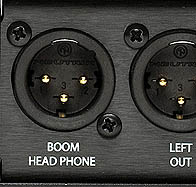 In addition to the two XLR LINE LEVEL outputs on the side of the ENG 44 mixer, there is a third XLR output designated for the MIC BOOM operator. This output is merely a connection for a second pair of headphones. Sort of like putting a Y cable into the headphone jack of the mixer. The headphone volume control affects both headphones.
The advantage of using an XLR connector for the second set of headphones is that it allows you to use a mic cable as the headphone extension cord. Traditional headphone extensions are flimsy, coiled cables that rarely exceed ten feet (without a lot of hard stretching!). Mic cables, on the other hand, can go as long as you need, even hundreds of feet!
I suggest that you use the same length of cable for both the headphone feed and the boom mic. Tape the two cables together to form a "duplex" or "snake". Attach an "XLR female to stereo headphone jack" adapter to the headphone cable, and that's it! Now, your boom operator can hear the complete soundtrack, so that he or she is aware of not only the boom mic, but also any other live mics working on the set.
In between takes, you can speak to the boom operator via your slate mic. But never use your slate mic during a take, as it will put your voice onto the soundtrack.
Because the BOOM headphone is controlled by the same volume control as your headphones, it is a good idea for each of you to use the same model of headphones.
And NEVER say anything over the slate mic that is confidential. You never know when someone else on the crew might be listening in on the camera, etc.
Installing the Optional Soft Field Case
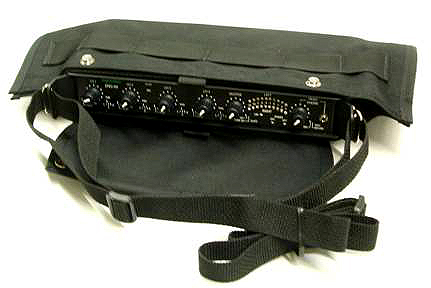 An inexpensive ($49.95) soft field case is available for the ENG 44 Mixer.
To attach the case, first place the velcro support belt around the mixer chassis. Align the strap loops to coincide with the strap wings on the mixer. Undo the shoulder strap, and insert each end thru both the mixer's metal strap wing and the loops on the velcro belt.
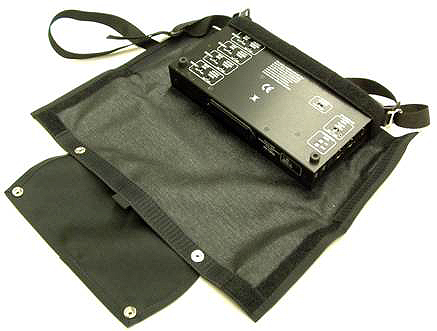 Spread out the soft case onto a work surface. Place the mixer on top of the case, aligning the top center of the mixer with the center point of the case. Make sure that you position the mixer so that the top of the case (where the accessory belt loops are) will be against the top of the ENG 44. Those belt loops are for attaching accessories, such as wireless mics, to your mixer.
Bring the bottom or underside of the case up and over the mixer (like folding a taco) and attach to the velcro.
The case also features a snap removable flap for protecting the control panel of the mixer when not in use. The flap can be stored completely out of the way by fully unsnapping all four connectors and re-positioning, or it can be in the "ready" position by attaching just the top two snaps on either side.