Low cut filters reduce the effect of wind noise, rumble, and vibration. They are most useful out of doors, where ambient noise is at its worst. However, some of the low cut filters on ENG panels tend to be pretty severe, so use them sparingly lest they cut into the quality of the voices too much.
Pay attention to consistency, so that all of your scenes that intercut will match up. If you choose to use the low cut filters on exteriors, then use them on all of your exteriors so that your actors voices (and background ambiance) match from shot to shot. Likewise, if you choose to leave the low cut filters off for interior scenes, don’t suddenly change your mind later on and engage the low cut for some interiors, unless you know that these scenes will not have to match or intercut with other interiors.
Some panels offer a limiter that will catch and compress any loud outbursts that may have gotten past the soundperson’s manual control. This keeps the signal from overmodulating and distorting in the camera. Depending on the aggressiveness (threshold) of the limiting circuit, some people prefer to leave the limiters off and do it all manually rather than suffer the consequences of automated “pumping”.
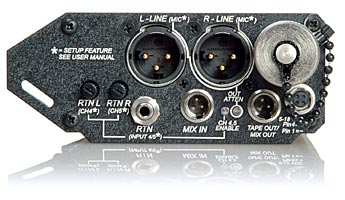 Outputs of the ENG mixing panels are usually selectable for line or mic level. Whenever possible, use the line level output of the mixer plugged into line level input of the camcorder. Line level is a much stronger signal and less susceptible to electronic interference in the environment.
Not all camcorders will accept line level, particularly the prosumer models. If your camera only takes external mic input, then make sure to use mic level output from your mixer, or a suitable adapter cable to take the signal down to mic level. Feeding a hot line level signal into a mic input will yield distortion and break-up.
Bear in mind that the metering system on your ENG panel may be scaled differently than that on your camcorder. Zero VU is not the same as zero digital. If your camcorder has a consumerish (VU type) meter, then start out by setting a zero tone from the mixer to zero level (just before the red) on your camcorder. Record a series of tests,lowering the camera input settings each time, and then playback the video to determine where you get the best volume with the least distortion. You may find that you need to compensate by going from zero on the panel to, say, a few “marks” below the red or yellow warning zones.
Even if your camcorder metering is digital, then you will still have to experiment to figure out the correlation between the mixer and the camcorder. Traditionally in digital recording, zero VU would equate to anywhere from negative 15 to negative 24 on the digital scale. But camcorders are not known for their precision in metering.
A good shortcut for setting levels involves feeding some normal dialogue into the camcorder (not exceeding zero VU on the mixer) and setting the camcorder to automatic audio level. Watch to see where the camcorder puts the dialogue. Then match that approximate level setting when you switch the camera back to manual.
Audio back to the camcorder
Some ENG soundpeople employ what is known as a “video snake” to connect their mixing panels to professional camcorders. This consists of a 15 to 25 foot multiplex cable (3 or 4 balanced mic cables in one sheath) that includes two balanced XLR mic cables to send the audio to the camera.
A third line (stereo mini connectors) brings return audio from the camcorder (headphone) back to the mixing panel. ENG mix panels usually have an input for audio return, so that the soundperson can verify that audio has made it cleanly to the camera.
A multi-pin connector in the single cable near the camcorder allows the soundperson to quickly disconnect or re-connect.
Another popular technique, especially amongst reality shows, is to use a “wireless hop”. This involves attaching a wireless transmitter (or two) to the outputs of the mixer, and then sending the signal over to the camera. It is no more difficult than if you were just using a wireless mic! Make sure, though, that you match up the mixer’s output level (line or mic level) to the correct input setting of the transmitter (line or mic level). Most wireless transmitters come set to microphone input level, by default, since they are usually used with lavalier mics. So be careful and check your settings.
For more detailed information on how to use specific model of ENG mixer, please go to our User Manuals section.