Mute
Mute 'kills" the audio of an input and removes it from the main outputs. In the case of some mixers, it actually re-routes the audio to another set of outputs, labeled Alt 3 &4, so that you can still record these signals onto a four-track recorder. Comes in handy if you want to record scratch tracks, interview questions, or other material that you prefer to keep out of your main mix.
The drawback to using Alt 3 & 4 is that once they are set, it is not convenient to ride herd on them during a take. So I tend to use them for 'disposable" information.
But after you master the use of your mixing board, you may find interesting ways of using these extra two outputs.
Solo
Depressing the solo button allows you to monitor only the selected input in your headphones. This is very useful for troubleshooting and checking mics.
Pre fade listen (PFL) means that you can listen to an input even if the fader is completely closed. It is good for cueing up a playback, or checking on a microphone.
Headphone Monitoring
Stereo headphones plug in to the phones jack of the panel. Only use a "Y" cable to connect two pair of headphones if both headphones are identical make and model, since audio quality for the sound mixer is critical and could suffer if two pair of headphones have differing impedance.
It is extremely important to set the headphones to proper listening level, since that is the preferred means of judging the relative volume of the mix. If the headphones are too loud, the soundperson will tend to under-record the mics. If the headphones are set too low, the mix will be too loud and will distort in the camera.
Good dialogue should sound pleasant and be right in the middle of your listening comfort zone. A loud shout or exclamation should be uncomfortable (but not painful). When your headphones are set correctly to your hearing, you won't even need to think about adjusting levels to make the meter happy; your hands will just do it automatically to please your ears!
 If you use a tone generator (and I strongly recommend that if your board does not have a built-in tone generator, that you buy one), set the tone so that your meter reads zero. Adjust the volume of your headphones (not the meter settings) so that the tone is just on the outer fringe of your comfort zone. Sort of like a bad phone call where you want to move the handset a short distance from your ear!
At the same time, send and record a zero tone from your mixing board to the backup digital recorder and/or camera. Zero on a VU meter from your mixer equates to around minus 20 on a digital audio recorder, and minus something on the camera. (Camcorders rarely have proper audio meters calibrated in dB, so you will have to experiment to find the right input level.)
If you are using a professional grade backup recorder, then the sound mixer should monitor directly out of the recorder whenever possible, in case something happens to the signal after it leaves the panel. Connections may get undone, radio stations can cause interference, recording levels get accidentally changed at the recorder, and so on.
Make sure that the camera operator or assistant is carefully monitoring the audio in the camera. Gently rub the windscreen of one of your mics before each take to make sure that the audio in the camera is from your mixing board and not defaulting to a camera mounted mic. It happens more than you can imagine!
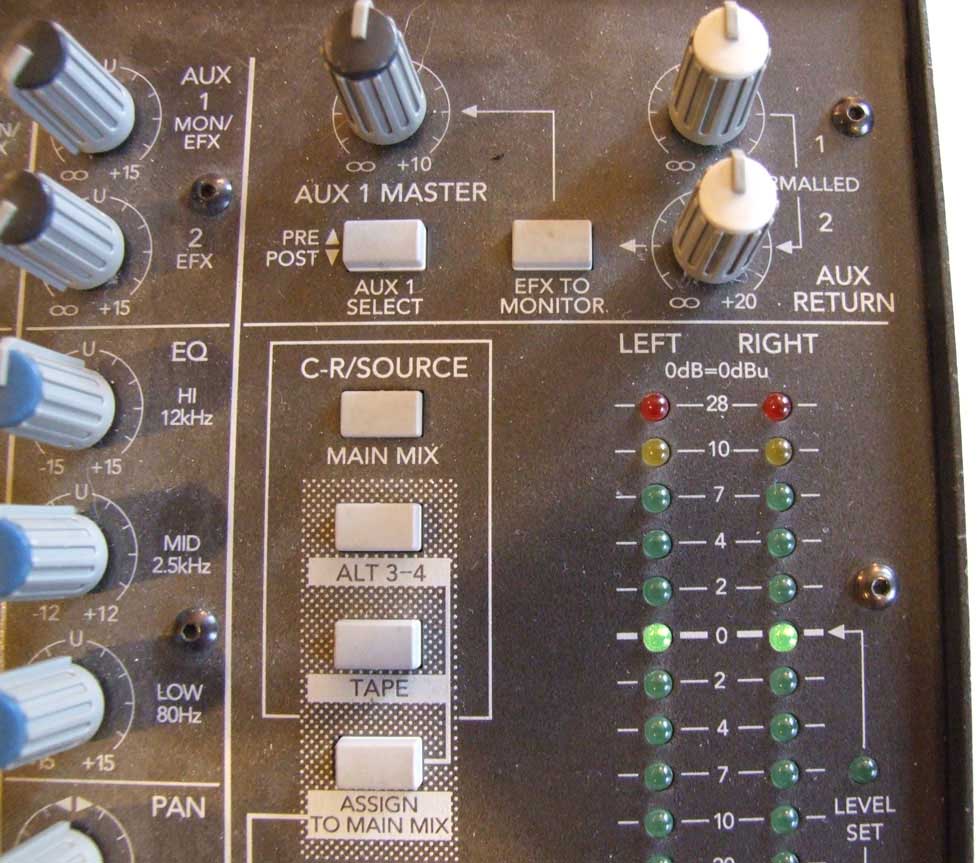
It is possible to monitor the recorder FROM the mix panel by bringing a return audio signal into the TAPE IN jacks (RCA connectors). There are buttons that allow the headphones (and Control Room jacks) to monitor the Main Mix (standard setting), Alt 3-4 (the mute buttons), or TAPE (return from recorder, or an additional line input source).
Normally, we would leave the C-R Source buttons for Alt 3-4 and Tape de-selected and NOT assigned to Main Mix (also de-selected). We DO select as our C-R Source the Main Mix (top button shown in the example). This means that the audio going out to our Main Mix is being monitored in the headphones (and Control Room Outputs) and also is being measured by the LED meters. If we de-selected Main Mix, then we would not hear anything in our phones nor see anything on the meters.
Alt 3-4 and/or TAPE (when this is a fresh source and NOT the return audio from the recorder) can be added to the Main Mix by selecting their respective buttons, and then selecting Assign to Main Mix, but that is for more advanced applications and not recommended for the novice.