.
Antenna considerations
A prime consideration when selecting the body site to hide a transmitter is the antenna path. We want the transmitter antenna to have optimum "line of sight" to the receiver antenna.
Body pack transmitters either utilize an antenna separate from the mic line or they integrate their antenna function with the ground wire of the mic.
If talent will be sitting on a metal backed chair, it would be a poor choice to have the antenna running along the back, say from waist to shoulder.
Similarly, if talent is facing up against a metal filing cabinet, then we would try to avoid rigging the antenna along the front.
Separate antennas offer greater control over the antenna path. We can rig the antenna solely on the basis of best line of sight.
The antenna should be kept somewhat taut, with just a little slack, which is best done by attaching a rubber band and safety pin to the end. The pin is secured to clothing, and the rubber band acts as a strain relief as the actor moves or bends.
The antenna should not loop over itself. If the best antenna placement is downward, then invert the transmitter rather than bend the antenna.
The antenna can be kept somewhat vertical (either upward or downward), or can be angled horizontally from the transmitter up to 90 degrees. If the transmitter antenna is angled, sometimes reception can be improved by tilting the receiver antenna to match.
The antenna should never cross over the microphone line. It is okay for the mic line to loop over itself (as when the transmitter is inverted). Always run the mic line and antenna away from each other; flip the transmitter if necessary so that the lines do not cross each other.
Moisture will absorb RF energy, and thus weaken the transmission. A rubber sheath of shrink tubing, fuel line, or surgical tubing can help isolate the antenna from excess perspiration, rain, etc.
The drawback to separate antennas is that they are an additional element to rig and hide. However, the disadvantage of combination antenna/mic lines is that the mic line must be cut to specific (antenna) length, and that the best mic path is not always the optimum antenna site.
Greater care must be taken to keep the mic cable/antenna as straight as possible. Avoid bunching up the mic/antenna line and "stuffing" it into a pocket or under a waistband, since this will reduce the transmission signal.
Receiver Antennas
Good antenna placement is the key to eliminating drop-outs and reducing the chances of interference.
Keep the antenna path as short as possible, and transmit through as few obstacles as possible. Place your receivers as close as you can to the actors. Receivers can be just on the edge of the set, or even hidden within the set.
It is more efficient to run a long length of audio cable from the receiver back to the mixing panel than to run a long antenna cable.
Think in terms of clean line-of-sight. The best place for your sound cart may not be the best place for your receivers!
The antennas might have a cleaner path coming in from the side or rear of the set
Mounting your antennas high will allow them to see over obstacles such as bodies and grip stands.
Be very careful when mounting receivers onto camcorders. Make sure that the antenna does not have to "see through" the camera body, monitor, or electronic accessories.
Be aware that a lot of RF interference can be generated by the recording electronics, and the viewfinder.
I have found that when mounting small, inexpensive receivers onto the shoe brackets of small camcorders, it is better to rotate the receiver so that the antenna faces the forehead of the operator rather than being located directly above the electronics of the viewfinder.
There are different types of receiver antennas.
The most common antennas that come with wireless mics are the stiff wire "whip" antenna and the short rubber sheathed helicoil "rubber duckie".
The stiff wire antennas are the most efficient, but may not be practical in an ENG situation. The rubber duckies are safer and more portable, but lose a little in terms of range.
Early ENG style receivers sometimes came equipped with a limp wire antenna, similar to those found on transmitters. The limp wire antenna is inefficient unless it is kept taut.
Compared to the wire whip or the popular rubber duckie, the limp wire is a poor choice.
Antennas as accessories
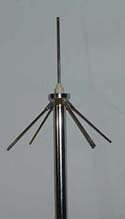 Ground plane antennas look like little camera tripods and are designed to take advantage of "ground plane" reflections, sort of the way a pressure zone or boundary plate mic uses a hard surface to gather sound. Ground planes work very well for stage shows and the like.
However, most field production involves a lot of electromagnetic equipment (lighting units, ballasts, coils of electrical cables) strewn on the ground in their path, so ground plane antennas would not be my personal choice.
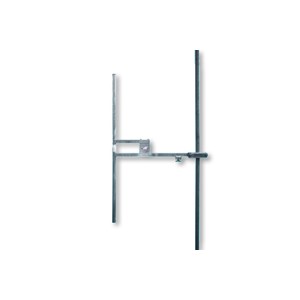 "Dipole" antennas look like two wire whip antennas mounted back to back, in a vertical configuration. They achieve "higher gain" by polarizing incoming signals (sort of like sunglasses). Radio signals that strike the antenna at ninety degrees (horizontal) are passed with greater efficiency than spurious signals bouncing all over the place.
In a sense, these two-element dipoles are 'directional' in that they see a single plane (picture Saturn's rings). Dipole antenna systems are very popular on professional motion picture sets.
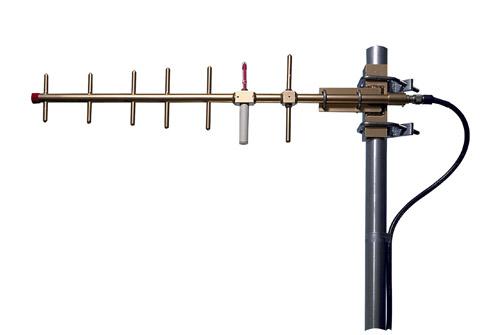 The yagi type of antenna resembles a two dimensional Christmas tree. It is a smaller version of household rooftop TV antennas.
 The yagi works like a shotgun mic. It is very directional and needs to be aimed towards the transmitter. They are also very common on professional sets.
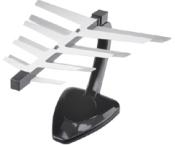
The (consumer) Zenith HDTV antenna on the left is very inexpensive, and works well with most UHF wireless systems. Just use an F to BNC adapter on the end of the antenna cable.