- Overhead boom
- Boom from underneath
- Boom mics as plant mics
- Lavalier mics as plant mics
- Lavalier mics as body mics
- Lavalier mics, wireless
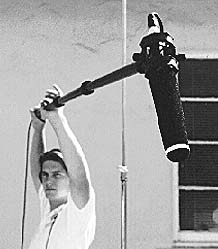 Overhead miking from a fishpole (or studio boom) is the most favored technique for film/video production and is the best choice most of the time.
Using a boom mic yields realistic perspective; and a natural blend of dialogue and sound effects (footsteps, hand prop noise, etc.) In contrast, body-worn lavaliers only provide a constant perspective (close-up sound) and may not pick up the other sound textures in the scene.
Another advantage of overhead shotgun miking is that it is much easier to capture dialogue from multiple actors in the scene. Two-shots, three-shots, no problem. When I used to mix episodes from a police drama, it was not uncommon for the camera to pan across a squad room full of officers. But with just one (sometimes two) boom mics, we could cover over twenty cast members!
The operational word here is "overhead." Why?
There is a tendency for filmmakers to rely too heavily on their camera mounted shotgun mics rather than separately mounted boom mics. Obviously, having a microphone on the camera is more convenient. But our objective in the field is not convenience, but obtaining the highest quality sound possible!
Think of your shotgun microphone as a telephoto camera lens. A long lens will isolate and magnify a distant subject, but at the same time it will compress the perceived distance between subject and background. Everything appears to be closer together than they physically are.
The same sort of spatial compression takes place with microphones. The voice of the subject will sound closer, but any noise in the background will also be magnified.
Therefore, the key to isolating voice without background noise is to create a line of sight with the microphone that sees the voice but does not see the background!
To put this in cowboy talk, aim the mic from ABOVE the subject so that the mic points DOWNWARD. The line of sight reaches from the front of the mic, to the mouth, and then towards the ground. Background noise and ambiance will strike the sides of the microphone (which is the maximum rejection angle) rather than striking the mic along its most sensitive front axis.
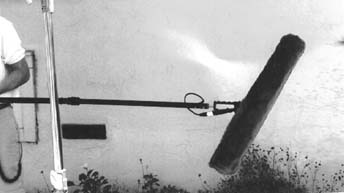 In the event that it is impossible to mike from above, the next best option is to mike from below, so that the line of sight terminates with sky. Miking upwards tends to emphasize bass a bit more, since the mic is seeing more of the chest cavity along with hearing more bass reflections from the ground.
Be careful, as many camera operators are not as accustomed to maintaining a strict lower frame line as they are at watching their headroom, so the mic tends to pop into the shot more frequently.
Another important consideration when booming is not just the angle of the mic but the distance. Shotgun mics are not designed to be used (for broadcast quality sound) at much more than a few feet. One of the great advantages of using the mic on a fishpole, as opposed to being attached atop a camera, is that the mic can be brought close to the subject even when the camera isn't.
I often tell novice boom operators that they aren't doing their job properly if the camera operator fails to complain that the mic is in the frame (during rehearsal). Every inch closer that the mic can be to the subject will improve the quality of the sound. Never fly the mic higher than it absolutely needs to be if you want to control echo and background noise. Several inches to a foot over the top of talent's head is ideal; up to a few feet overhead is okay depending on the situation.
 Place a thin strip of white tape on the tip of your boom mic's windscreen to make it obvious in the camera viewfinder. Better for the operator to notice it on the set than for the editor to discover it lurking in the frame during screenings! To achieve the closest mic placement, always begin with the mic clearly visible in the frame, and then move it outward gradually until it clears the viewfinder. Had you started with the mic placed way out of frame, and gradually moved closer -- the camera operator would probably have panicked and instructed you to stop way far above the frameline.
Some camera operators confuse width with height. A wide-angle lens means wide from left to right; it doesn't mean that they have to reveal several feet of air above the talent's head. A simple tilt-down of the lens will correct excessive headroom in the composition when using a wide angle lens!
Learn to recognize and take advantage of the on-axis (live) and off-axis (deader) angles of your mics. Most shotgun mics are very much on-axis at the front (say, twelve o'clock), and taper off towards the back (six o'clock). But at exactly six o'clock, there is an increase of sensitivity! In other words, the back of the mic does not offer the most rejection to background noise. The most rejection occurs around four o'clock and eight o'clock respectively.
So to decrease a source of noise, you would not want the mic facing directly away from it, as that would only serve to put the noise at the live spot in the back. Instead, angle the mic so that the noise source strikes slightly to the side and rear.
When deploying your mic overhead, keep these angles in mind. Often it is better to compromise the angle of the voice (slightly) in order to keep heavy background noise to a minimum. Any angle of the mic should be consistent with the source of the worst noise. For instance, a person talking on the sidewalk would put the mic overhead, but cheated towards the buildings and away from traffic -- even if the camera changes shot angles.
Similarly, a subject walking along the edge of the surf on a beach should have the mic facing inland, not out towards the noisy surf.
Another important factor to pay attention to is "perspective". The distance between microphone and subject should agree with the distance to the screen or camera. In a long shot, it is natural for the voice to sound more distant and for there to be a greater presence of ambiance. Close-up angles should consist of more voice and less background.
However, angle of motion is very important. A person walking away from the camera should not be walking towards the microphone, or vice versa! Novice boom operators are notorious for perching themselves in a safe spot out of the frame that places the mic in a position not consistent with the direction of travel relative to the lens.
A person with their back to camera should not be facing the mic. A person walking up to the camera should not be walking away from the mic.
To balance a strong voice against a weak voice, use your mic angle and placement rather than riding gain (volume) on your mixer/recorder. Let the strong voice strike the mic slightly off-axis and/or from a little more distance than the softer speaking actor. This will balance the relative volume of both people without having the background noise continually changing during the shot.