 Creating music videos is a delicate process, one that can be easier or harder depending on the images, sequences, and complexities involved. But at its core they are essentially videos shot to sync audio. Here's a workflow that'll keep you from tearing your hair out and make you aware of common novice pratfalls.
Thematic Concerns:
Music Videos consist of picture cut to a song. Simple enough definition, but we can expand on this somewhat.
The Music Video can take one of three probable formats: wild (non lip sync) picture cut to music; lip sync performance cut to the music; or a combination of the two.
We see examples of the first style, wild picture cut to the music, commonly in the documentary genre. Often it is a montage of related images including pan/scan of still photos and/or excerpts from film archives. Sometimes the filmmaker will juxtapose a series of images against a familiar song as a way of making a poignant statement, playing emotional images against recognizable lyrics to produce a sum greater than either of its individual parts! For example, the song “When Johnny Comes Marching Home Again” normally conveys Civil War bluecoats or WWI doughboys parading victoriously down Main Street. But replace that cliché with a montage of flag draped coffins being unloaded from a military transport, grieving families, and crying children – and the tune has a totally different impact.
Wild picture cut to music also shows up from time to time in feature film production, again as a montage of transitional images either as backstory exposition or to promote the storyline (and it is not unheard of to include a montage strictly as a vehicle for promoting the song!).
Lip Sync Performance is more of what most people think of when you mention Music Video. A collage of images and angles of the musicians as they appear to perform the song in its entirety. The images may represent a “live performance” on stage, or a “live take” in the recording studio. Sometimes the musicians venture beyond reality, and appear to perform in a myriad of locations and situations, all without missing a beat of their song!
Which brings us to the third style of Music Videos wherein a continuous performance is intercut with non-sync lyrical images to combine into a complex fantasy image. Sometimes we see the musicians performing their song, and other times we are treated to the visual imaginations of the director (which can range from intensely entertaining to childishly moronic).
Novice filmmakers often try to act out the song exactly as it plays. Boring! Redundant!
The most successful Music Videos go beyond merely illustrating the lyrics word for word. The Director strives to relate the images to the song, but at the same time to give ADDED meaning to the original text. More than likely, the viewer/listener is already familiar with the song, having heard it countless times on the radio or the Ipod. To spark renewed interest in the music, a good Director is able to present the lyrics in a new perspective with some deeper significance; or at least in a refreshingly entertaining visual tour de force.
It is extremely important to note that Performance sections are always shot to pre-recorded audio playback. This is done because it is impossible for even the finest musicians to repeat their live renditions precisely enough to allow various takes to be linked together without skipping a beat, nor altering tempo, nor changing pitch, etc. Repeatable playback is essential if we expect to shoot multiple takes, multiple angles, and possibly even spread those takes over multiple locations/times.
Even the so-called “live concert performances” are done by recording the first take (shot live multi-camera) and then playing back that first performance track in order to shoot additional angles or takes.
Technical Aspects of Shooting to Sync Playback:
Non lip sync sequences for Music Videos are relatively easy. Since the images do not require frame to frame alignment with the music and lyrics, the filmmaker is pretty much free to do whatever they want. Footage can be shot at any frame rate (overcranked for slow motion, undercranked for accelerated motion, stop-frame, etc.) Sync playback of the music during shooting is not a requirement, although many filmmakers prefer to listen to some sort of rough playback track (also referred to as a tempo track) to guide them in terms of shot length (for eventual cutting to the beat) and pacing of camera moves (to match the mood or pace of the music).
However, when we are shooting a Performance sequence for a music video, then strict adherence to sync playback rules must apply.
When we record sync dialog for a movie, it is critical that the recorded audio be able to match the played back (video or projected) picture frame for frame, or else the actors will appear to be out of sync. Being off by even a fraction of one percent is enough to ruin a scene. That is why professional motion picture cameras run at speeds carefully regulated by crystal controlled motors and the production audio recorders rely on complex sync and/or timecode systems to completely eliminate any speed variance (wow & flutter). Both the film camera and the audio recorder capture the scene in REAL TIME so that they can be aligned later during editing and played back with accurate lip sync.
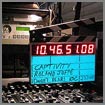
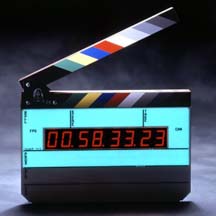
The traditional clapstick slate (or modern timecode) is used to line up the respective audio track with its matching picture.
Of course, if audio is originally recorded simultaneously on the videotape, as in a video camcorder, then lip sync is guaranteed since we do not need to concern ourselves with matching up the track from an audio recorder with that from the camcorder.
When we shoot a music video, the audio is NOT recorded live on the set, but is instead PLAYED BACK for the musicians to pantomime in lip sync to. It is sort of like recording live dialog, but in reverse. The audio track must be able to match the camera track frame for frame, or else the lips will be out of sync. This requires a camera with crystal controlled speed, and an audio playback system completely devoid of any wow & flutter. If the audio does not play back at precise speed every single take, then the musicians will be pantomiming to a song that may be several beats off tempo from the actual recording (the actual song that appears in the finished music video).
To do sync playback, you will need a recorder or playback device that is capable of speed accurate playback every time. That means a reliable digital recorder or laptop device. In addition, we need some way to record a signal onto the camera to allow us to know what section of the music was playing while we were filming.
Here is how we do it in the professional world…
The first step is to obtain a copy of the final music selection that the artists will be performing to in the music video and create an EDIT MASTER. That means making a digital copy of the music that has SMPTE timecode added to it. The timecode should run at 29.97 NonDropFrame rate for standard video or DVD, and 23.976 for HD.In addition to the frame rate, pay attention to the sampling rates being used. Digital recorders rely upon the sampling rate for playback speed more than the timecode, which is used for syncing back to picture later on.
It is strongly recommended to check with the POST PRODUCTION SUPERVISOR regarding what settings to use, as the digital editing workflow is continually evolving with each new release of software.
This piece of music will become the master soundtrack that we will edit our music video images to.
Multiple copies of the EDIT MASTER (with matching timecode) will be produced for us to playback in the field during production. Format will match the type of audio device that we will be using for sync playback. These copies are called PLAYBACK DUPES.
In the event that we are using a non-timecode digital recorder for playback, the PLAYBACK DUPE will be mixed down to mono, so that the file will have music on the left track and SMPTE timecode on the right.
Out on the set, the Director will call for the camera to roll first, and then call for the Playback. As the music begins playing, we need some means to identify the musical section for the camera. This is professionally done by means of the timecode that was pre-recorded alongside the music. A timecode slate is used to display the running timecode for the camera to photograph. This provides a match frame for the video editor to use in order to align picture with the appropriate point in the master song.
After shooting a brief amount of the timecode slate, the Director is free to call for Action.
 A master angle is usually shot, covering the entire song. After that, only selected portions of the song will be played back in order to get good close-ups and inserts. Only a brief lead-in of the music will play to allow the musicians to get into the rhythm, continued by the section that the Director needs to film.
Although not recommended by professionals, it is possible to shoot a music video in VIDEO without timecode, since audio can be recorded in the camera. In this case, the camera would hear (either through a mic or a direct connection to the playback device) the section of music being played back. Later, the editor would just have to manually line up the audio on the video against the master soundtrack. It is not as fast as doing it with matching timecode numbers, but it can be done. Note that the audio recorded on the camera is deleted from the edit as soon as the picture is aligned with the master soundtrack. Never try to make a music video by patching together audio snippets of the song, even if they were recorded clean onto the camera.
Editors Note: Recently, a new software program came onto the market known as Plural Eyes, by Singular Software. This program interfaces with many editing platforms, and utilizes the waveforms of audio tracks to function similarly to timecode for lining up a master soundtrack to the scratch audio tracks recorded onto the camcorders. This makes it easy for the "timecode deprived" videographer to sync up multiple cameras covering an event, or to shoot a music video! Won't help you if you are shooting sprocketed film, however.
Shooting a music video is a long and tedious process. It only takes one slip by one musician to screw up the lip sync, play to the exact note sync, of a take.
A short, two or three minute song can easily take days to shoot!
Now, back to the techie stuff…
If we are shooting in NTSC 29.97 frame video, then we only have to playback the music at its correct and original speed. The PLAYBACK DUPE is played back at the same speed that it was originally recorded at. Make the DUPE at 29.97, and play it back on the set in real time (29.97).
But if we are shooting with a motion picture camera, the situation gets a bit complicated. When film is transferred to video, it actually gets slowed down just a wee bit in order to compensate for the fact that film runs at 24fps (a whole number) and video runs at 29.97 (a mixed number). To make 24 into 30, we shoot some of the frames an extra time (known as the 3-2 pulldown).
The 3-2 pulldown works like this. Every 4th frame is printed (or scanned) twice. That gives us 6 extra frames, for a total of 30. Example: 1, 2, 3, 4, 4, 5, 6, 7, 8, 8, 9, 10, 11, 12, 12, 13, 14, 15, 16, 16, 17, 18, 19, 20, 20, 21, 22, 23, 24, 24.
But to make 30 into 29.97, the whole system has to slow down slightly (0.1% to be precise).
What this means is that picture will be running slightly faster on the set then it will be in video. So if the picture slows down during transfer, and the audio does not – picture will be out of sync with the audio. Musicians will be out of sync with their music!
To correct for this, we have to play the music back at exactly 0.1% faster on the set than the final song will be. This will make the musicians lip sync slightly faster, so that when the footage is slowed down, the slower lip syncing will now match perfectly with the EDIT MASTER original song.
Here is how we get the music to playback faster. Professional audio recorders used for filmmaking have the ability to pull-up their playback rates by 0.1%. Timecode that was originally 29.97 will now playback at the rate of 30.
If the audio recorder does not have the internal capability to change speed in this manner, then we manufacture our PLAYBACK DUPES so that they are now at the 30 frame rate (remember that our original music is 29.97). The speed-up or pull-up is done when we record the Dupes, so that our playback devices do not have to deal with speeding up what they play. The machines just think of it as a regular song to be played back. Timecode (at the 30 frame rate, because that is what we recorded when we made the special DUPES) is played back and fed to the timecode slate on the set, so that it can be photographed by the film camera.
Sync playbacks can be even more complicated in terms of playback rates depending on what medium is being used for the shoot compared to what medium is being used for editing & final release.
 High Def Video cameras run at 23.976, but the video is converted for editing to conventional 29.97 NTSC rate. It works out technically that if a 3-2 pulldown is applied to 23.976, which happens either in the camera or in the editing software, you end up with regular 29.97 NTSC. There is no 0.1% speed change in the process, so audio can be recorded (and played back) in regular 29.97.
Some video camcorders claim to shoot at 24 frame Progressive or 30 frame Progressive. The Progressive term refers to exposing all of the pixels in the frame in one blast, rather than scanning it in line by line the way normal video does. Also, in normal video, each frame is actually scanned in two passes (known as fields). That is why video looks so “live” and fluid. But Progressive captures each field in one shot, and then interpolates the data to fill in the second field of the frame. That gives it the “film look”.
The so-called 30P rate is actually 29.97. For the purposes of audio, treat it the same as regular 29.97 NTSC video.
However, 24P is not actually running at 24 frames per second, like a film camera. Instead, it is going at 23.976 (just shy of 24 fps). The 3-2 pulldown comes into play, and what comes out of the camcorder is actually 29.97 NTSC video (just that the frames/fields are sharper, and every 4th frame is repeated). All of this takes place in real time, so there is no 0.1% speed change taking place. Just use the 29.97 rate for audio, whether it is live recording or sync playback of music tracks.
Some motion picture cameras may run at 30 frame rather than 24, or even at 23.976 or 29.97. If that is the case, then treat 30fps film the same way you would 24fps, which is to record (or playback) your audio at 30 frame SMPTE, to allow for the 0.1% speed change. A sync playback tape would be prepared at 29.97, with intent to playback on the set at 30. Live dialogue would be recorded on the set at 30, with intent to transfer into video at 29.97.
Film cameras running at 23.98 or 29.97 would NOT require a speed change in their conversion to video; so all of your audio would remain in real time at 29.97.
Note that shooting with the really elaborate High Def video cameras used by Hollywood can get complex, due to the fact that to record matching timecode on the video to match the timecode on the audio involves “jam syncing with tri-level sync” in order to get all of the numbers to match precisely. If this sounds a bit over your head, it should. Don’t worry about it, though. By the time you are at that level in production, you will have access to a lot of highly paid technical folk to help you through it.
This article is only meant as a simple introduction; and is geared for beginning filmmakers.
The short version of this tutorial is to use 29.97 fps timecode for video, whether it be regular NTSC, 30P/24P “film look”, or prosumer High Def video.
When shooting actual 24fps or 30fps motion picture, then you have to deal with the 0.1% speed change, so keep your audio at 30fps timecode. Live dialog will end up being slowed down to 29.97 during transfer to video; but sync playbacks will be speeded up from their original 29.97 to 30 fps when played back on the set.
If you will be shooting your music video with anything other than conventional 24 frame film or 29.97 frame NTSC video, then double check with the film lab and video editing facility for advice on what frame rates to use for sync playback. And get the instructions in writing, signed off, so that fingers can’t be pointed at you later on in the event that you were given incorrect information!
Audio Playback Techniques:
 The musicians need to hear the music being played back. Usually, this is done by outputting the playback device to a conventional amplifier & loudspeaker system.
Professional musicians are often partially deaf from all their exposure to amplified music, and may demand that you use concert loud volume for playbacks. If so, make sure that you wear hearing protection (insertable earplugs) so that you and the rest of the crew don’t end up like them!
Most of the time, though, you ought to be able to get by with just audible playback levels from a small speaker/amp system.
Sometimes it will be necessary to record live dialog while a sync playback is going on in the background (more often done in feature films than music videos, but some artists do want to slip in a line of dialog or two). If this is the case, then you must be able to provide silent playback.
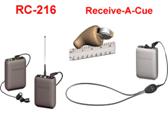
Silent playback may be as simple as just having the musicians wear small earpieces. Wires go down their necks, under their wardrobe, and eventually plug in to a headphone distribution box.
If the musicians (or dancers) are scantily clad, then we can use induction earpieces. These are similar to wireless hearing aids; they pick up audio transmitted by a local antenna. In the example of hearing aids, these wire loop antennas are worn around the collar region underneath clothing. They broadcast a weak signal up to the earpiece; hence there are no visible wires. For music videos, we run an antenna wire completely around the set and power it from a 200 to 400 watt audio amplifier (usually used to drive loudspeakers). The antenna wire is simply regular hobby wire connected to the speaker terminals of the amp. A resistor or two is added to the wire so that the amp does not burn itself out looking for the loudspeaker. Anyone located within the perimeter of the wire antenna will be able to hear the music (or instructions) in their miniature, hidden-in-the-ear earpieces.
Another silent playback technique is to replace the loudspeakers with sub-woofers. These sub-woofers are adjusted so that they can only put out extremely low frequency sounds, usually under 60 hertz. The musicians and dancers can feel the beat, but the pulses of the music are too low in frequency for motion picture microphones to hear.