Holding the boom
To reduce handling noise, grip the pole firmly but not tightly with your fingertips and avoid excess hand or finger movement such as tapping or drumming. Some boom operators wear white editing gloves to reduce finger sticking on excessively cold or hot days.
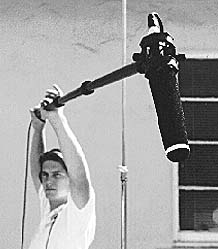
Hold the boom parallel to the floor and high above your head with both arms. If you support the boom underhanded like a flagpole, the boom will enter the scene at a steep angle. Although the mic may be high enough to clear the frame line, the body of the pole may cut across the corner of the frame.
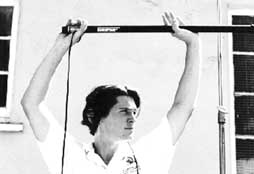 Proper arm placement: vertical and close-in.
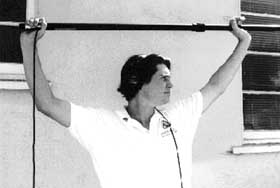 Keep your arms close to your head, sort of like a capital "H". When your arm is vertical with the elbow locked, all you are doing is supporting a couple pounds of weight in a straight line with your body. If your arms are extended in a wide "V" (see picture at right), your muscles will fatigue quickly. Also, when your arms start from a true vertical, it is possible to quickly reach in or out with the boom to follow the action.
Use your front arm as a fulcrum to support the pole above your body. If the situation permits, grip it towards the natural balance point of the boom. Use the rear arm to steer (pan/tilt) the boom, as well as to rotate the pole in order to cue (aim) the microphone.
If you are new to booming, and find that you need support in holding the boom during long takes, here is some advice. Do not put a support under the boompole itself. Instead, arrange a support for under your elbow. For example, rig a sandbag or small pad on the top of a lighting stand, and position the stand just under where your supporting elbow will be for most of the take. Because the pole remains completely in your hands, there is less noise during "landing" and "take-off".
Microphone Placement
Try to position the mic as close to the action as possible. Depending on the situation and the characteristics of each particular microphone, your mic may be several inches to a few feet overhead of talent.
Be aggressive in your mic placement. Ten feet overhead may be very convenient for the camera and lighting crew, but your dialogue will be poor. Remind the director that a wide angle lens can always be tilted downward so that the frame is not filled with ceiling or sky at the cost of his soundtrack!
Professional boom operators often place a strip of white tape on the tip of the windscreen so that the camera operator can readily spot if the mic has dipped into the shot. Better to see the mic in the viewfinder than to wait until it shows up on the big screen.
To establish a working frame line, dip the mic completely into the shot and slowly raise it up until the camera operator tells you that you’re just barely clear. If you start the boom up high and gradually lower it towards the frame, the camera operator will usually play it very conservative and tell you to stay higher than necessary.
Boom operators should always wear headphones so that they can monitor, not just their own shotgun mic, but any and all mics that may be in play on the set. If the boom mic picks up audio that is simultaneously being heard on the same track by a planted microphone or lavalier, there may be an immediate increase of echo and hollowness caused by phasing interference.
In conclusion
 The microphone boompole, in all of its relative simplicity, is usually the best tool for acquiring dialogue on the set. But the art of booming is a skill that requires a basic knowledge of microphones; gentle strength; and complete concentration. It is not a task or crew position to be assigned to anybody standing around on the set.