 Rigging the Talent
Attaching the body pack transmitter
Hiding the transmitter under the wardrobe of most male performers is usually fairly simple, due to the fact that men generally wear looser fitting clothing.
Bulging pockets are common: stuffed with wallets, keys, handkerchief, comb, coins, etc. The presence of a small transmitter case rarely upsets the visual lines of the fashion.
Where the transmitter will be hidden is dependent on a couple of factors, such as the physical actions or stunts, and the contours of the wardrobe.
Common sites for the transmitter include: inside the waistband of trousers, and the inside pocket of a jacket or sport coat. Other sites are: inside the trouser leg, under the armpit (like a shoulder holster), across the small of the back, or inside of a hat.
A safety pin can be attached to the transmitter by means of tape or a thick rubber band, allowing the transmitter to be easily pinned onto wardrobe.
ACE bandages are another convenient way of securing the radio mic.
Professionals usually carry a variety of custom elastic belts and cloth pouches to facilitate rigging. The transmitters fit inside of the pouches, which can then be pinned directly to clothing or slipped over thin, lightweight elastic belts.
The Velcro closured belts can be worn around the waist, thigh, etc.
A couple of quick notes about belt and pouch kits. The belts should be thin; porous if possible. Velcro and elastic can cover a wide range of sizes.
White usually conceals easier than darker colors. Very importantly, keep the belts freshly laundered.
Hiding the transmitter on a female is often more complicated, due to the differences in fashion.
Whereas men's clothing is commonly loose-fitting and lumpy, women's fashions tend to be closely contoured to the body.
A variety of elastic belts are much more important, since the thinner fabrics may not support the weight of a pin-on transmitter.
Choice of sites are based on wardrobe style, camera angle, and physical action.
Places to rig transmitters include the small of the back (waist belt), the back of the bra, upper back (X-shaped rig), under the arm, on the inside thigh (intimate, but works for short, tight fitting skirts), the back of the neck (under long hair), inside a leg warmer, under a hat, or even under a wig (to accommodate on-screen nudity).
Be considerate of talent's privacy when preparing to rig them. Don't advertise all over the set that you are about to hide a transmitter under someone's clothing!
Avoid the use of camera or gaffers tape directly against the skin. Use some sort of cloth liner, first aid gauze, or even toilet paper to protect the skin from these tapes.
If you are in a situation that requires taping directly to skin, then use a medical surgical tape designed for that purpose.
Remember to clean the surface of the skin first with an alcohol pad, in order to remove oils and dirt
.
Antenna considerations
A prime consideration when selecting the body site to hide a transmitter is the antenna path. We want the transmitter antenna to have optimum "line of sight" to the receiver antenna.
Body pack transmitters either utilize an antenna separate from the mic line or they integrate their antenna function with the ground wire of the mic.
If talent will be sitting on a metal backed chair, it would be a poor choice to have the antenna running along the back, say from waist to shoulder.
Similarly, if talent is facing up against a metal filing cabinet, then we would try to avoid rigging the antenna along the front.
Separate antennas offer greater control over the antenna path. We can rig the antenna solely on the basis of best line of sight.
The antenna should be kept somewhat taut, with just a little slack, which is best done by attaching a rubber band and safety pin to the end. The pin is secured to clothing, and the rubber band acts as a strain relief as the actor moves or bends.
The antenna should not loop over itself. If the best antenna placement is downward, then invert the transmitter rather than bend the antenna.
The antenna can be kept somewhat vertical (either upward or downward), or can be angled horizontally from the transmitter up to 90 degrees. If the transmitter antenna is angled, sometimes reception can be improved by tilting the receiver antenna to match.
The antenna should never cross over the microphone line. It is okay for the mic line to loop over itself (as when the transmitter is inverted). Always run the mic line and antenna away from each other; flip the transmitter if necessary so that the lines do not cross each other.
Moisture will absorb RF energy, and thus weaken the transmission. A rubber sheath of shrink tubing, fuel line, or surgical tubing can help isolate the antenna from excess perspiration, rain, etc.
The drawback to separate antennas is that they are an additional element to rig and hide. However, the disadvantage of combination antenna/mic lines is that the mic line must be cut to specific (antenna) length, and that the best mic path is not always the optimum antenna site.
Greater care must be taken to keep the mic cable/antenna as straight as possible. Avoid bunching up the mic/antenna line and "stuffing" it into a pocket or under a waistband, since this will reduce the transmission signal.
Receiver Antennas
Good antenna placement is the key to eliminating drop-outs and reducing the chances of interference.
Keep the antenna path as short as possible, and transmit through as few obstacles as possible. Place your receivers as close as you can to the actors. Receivers can be just on the edge of the set, or even hidden within the set.
It is more efficient to run a long length of audio cable from the receiver back to the mixing panel than to run a long antenna cable.
Think in terms of clean line-of-sight. The best place for your sound cart may not be the best place for your receivers!
The antennas might have a cleaner path coming in from the side or rear of the set
Mounting your antennas high will allow them to see over obstacles such as bodies and grip stands.
Be very careful when mounting receivers onto camcorders. Make sure that the antenna does not have to "see through" the camera body, monitor, or electronic accessories.
Be aware that a lot of RF interference can be generated by the recording electronics, and the viewfinder.
I have found that when mounting small, inexpensive receivers onto the shoe brackets of small camcorders, it is better to rotate the receiver so that the antenna faces the forehead of the operator rather than being located directly above the electronics of the viewfinder.
There are different types of receiver antennas.
The most common antennas that come with wireless mics are the stiff wire "whip" antenna and the short rubber sheathed helicoil "rubber duckie".
The stiff wire antennas are the most efficient, but may not be practical in an ENG situation. The rubber duckies are safer and more portable, but lose a little in terms of range.
Early ENG style receivers sometimes came equipped with a limp wire antenna, similar to those found on transmitters. The limp wire antenna is inefficient unless it is kept taut.
Compared to the wire whip or the popular rubber duckie, the limp wire is a poor choice.
Antennas as accessories
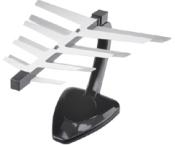
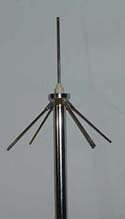 Ground plane antennas look like little camera tripods and are designed to take advantage of "ground plane" reflections, sort of the way a pressure zone or boundary plate mic uses a hard surface to gather sound. Ground planes work very well for stage shows and the like.
However, most field production involves a lot of electromagnetic equipment (lighting units, ballasts, coils of electrical cables) strewn on the ground in their path, so ground plane antennas would not be my personal choice.
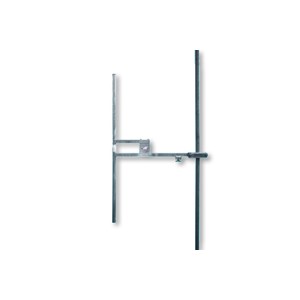 "Dipole" antennas look like two wire whip antennas mounted back to back, in a vertical configuration. They achieve "higher gain" by polarizing incoming signals (sort of like sunglasses). Radio signals that strike the antenna at ninety degrees (horizontal) are passed with greater efficiency than spurious signals bouncing all over the place.
In a sense, these two-element dipoles are 'directional' in that they see a single plane (picture Saturn's rings). Dipole antenna systems are very popular on professional motion picture sets.
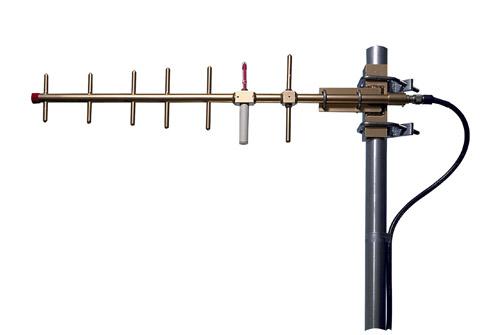 The yagi type of antenna resembles a two dimensional Christmas tree. It is a smaller version of household rooftop TV antennas.
 The yagi works like a shotgun mic. It is very directional and needs to be aimed towards the transmitter. They are also very common on professional sets.
The (consumer) Zenith HDTV antenna on the left is very inexpensive, and works well with most UHF wireless systems. Just use an F to BNC adapter on the end of the antenna cable.
Clothing noise
Wireless transmitters do not suffer from clothing noise. However, the lavaliers plugged into them certainly do!
Rig your lavaliers the same as you would if they were hardwired.
For the benefit of readers who missed the article on lavalier mics, here are a few pointers:
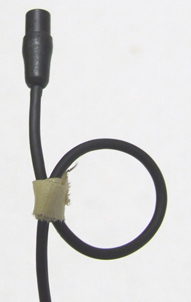 Make a small loop near the mic capsule. Secure the loop loosely with a piece of thread or a thin strip of camera tape (sticky side out). The loop should be able to freely open and close if the cable is tugged. This loop serves to cancel out most cable noise conducted along the rubber sheath of the mic cable.
Eliminate contact clothing noise by securing the wardrobe on both sides of the mic capsule. If the clothing is not free to rub against the mic head, then there won't be noise.
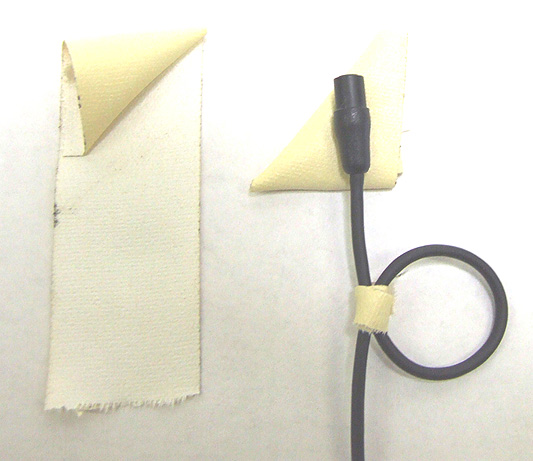 A popular technique is to sandwich the mic head between two sticky triangles made from camera tape. Start with a two inch long strip of (one inch wide) camera tape, and fold it corner over corner like a flag, sticky side out. Make a second triangle the same way. Then sandwich the mic between them, being careful not to block the grill.
In the case of a button down shirt or blouse, attach the sticky triangle onto the fabric overlap, just above one button. Let the tied off loop hang opposite of the button.
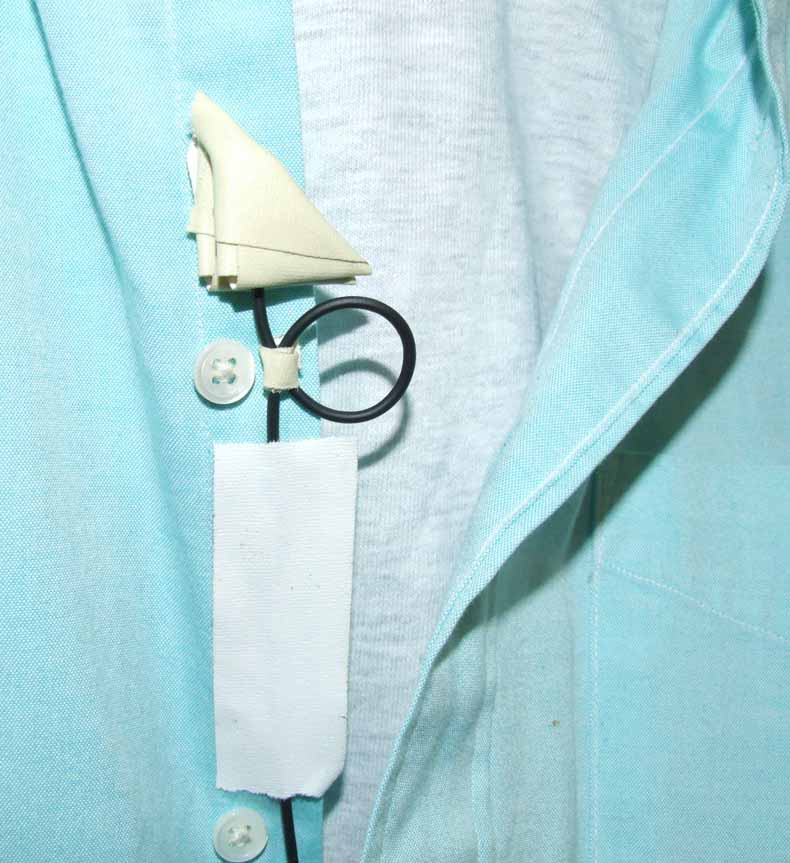 Secure the next inch or two of mic line with a simple strip of camera tape along the overlap, running vertically downward towards the next button. Any tugging on the cable will be strain relieved by the section taped to the clothing.
The floating loop will isolate the mic capsule, and the twin sticky triangles will prevent clothing from rubbing across the mic itself.
Wiring a female can be simpler. If she is wearing a bra, arrange the triangles over the mic so that one point is down. Secure the mic inside of the bra, at the "cross your heart" juncture in the center of the bosom.
A small strip of surgical tape can be used to anchor the mic cable along the upper abdomen. The natural swell of the bosom protects the mic from clothing contact, as well as positioning it out from the chest cavity.
Clothing noise can also be acoustic in nature, and is created by clothing fibers rubbing against each other.
Starched clothing is very noise conductive, so soften the cloth with a light mist of water wherever the camera won't notice it, such as under the sports coat. Soften a patch of clothing around the site where the microphone is to be attached.
Combat noise from clothing friction with Static Guard.
Wind noise can be alleviated by salvaging the foam tip from a (used) video cleaning swab. Pull the tip off of the stick, and slice the base off. What remains is a foam hood that will slip over most lavaliers.
These free windscreens can be painted with marking pens to be less visible. And since they cost nothing, there is no risk of sandwiching them within tape that would destroy the foam upon removal.
Additional wind protection can be achieved by wrapping some cheesecloth over the mic. Cut off the fingertip from a pair of child's or woman's knit gloves, and pull that hood over the mic and cheesecloth.
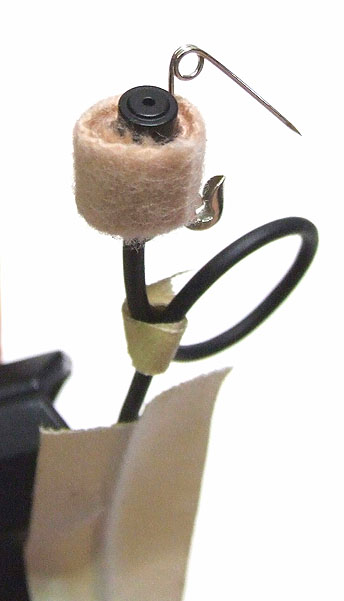 Another useful trick for rigging lavaliers is to use moleskin and safety pins.
This technique is particularly effective when you have to wire talent quickly, or if talent is going to be very physically active and might otherwise dislodge a taped on mic.
Wrap a layer of soft moleskin around the head of the mic. Insert an open safety pin, and then wrap another layer to secure it. The lavalier is now ready to be pinned in place under wardrobe. The moleskin tends to insulate the mic capsule from most clothing noise.
An additional strip or two of tape or moleskin can be added to help prevent clothing from rubbing against the mic, and to strain relief the mic cable.
In conclusion
Here are a few points to remember about wireless mics:
Don't expect miracles.
Even the best Hollywood sound mixers have to wrestle with their wireless. The range is never what you expect nor what the spec sheets claim, because you will not be operating in a perfect environment.
If you need increased range, try utilizing a dipole or yagi antenna system. You can request them when you rent or purchase your wireless. If the salesperson doesn't know what you are talking about, go to a real sound house run by mixers!
Another way to increase your range is to shorten the distance between the transmitter and receiver. Have someone carry the receiver and walk the distance parallel with the actor.
The more units that are working simultaneously, the increased likelihood of them interfering with each other.
Actors passing close to each other may generate a buzz. If you know that actors will be working close, assign them units on frequencies as far apart from each other as possible. Think carefully before you just grab a radio mic and stick it on someone.
Check your batteries often. Weak batteries in the transmitter or receiver are the main cause of problems.
Periodically re-check your transmitter rigging. Actors have a tendency of adjusting their wardrobe, and upsetting your carefully positioned mic and/or antenna placement.
If talent will be perspiring a lot, or working in rain or near water, then it is a good idea to encase the body pack transmitter in a protective condom and seal it with electrical tape. Use standard non-lubricated latex condoms.
But don't forget to warn your personal mate as to their professional use, lest they be discovered when you get home! You won’t need a wireless to hear the screaming from the next room.