 Originally, the term "lavalier" referred only to the "neck-worn" or "body-worn" class of small microphones. These days, the working definition of lavalier has been extended to include virtually any miniature microphone small enough to be worn on the body and/or hidden in the set.
A brief history
The first lavaliers used by our industry were large, dynamic microphones about the size of a cigar tube. These mics were traditionally worn around the neck by means of a lanyard (lavaliere). The mics were very rugged, but had a very short pick-up range and had to worn close to the mouth. Because of their relative insensitivity to sound, they were very feedback resistant. Units manufactured by Sennheiser and ElectroVoice were very popular in their time; many can still be found at garage sales, priced to go at almost free.
By the way, it is worth noting that the author still keeps a vintage ElectroVoice 649B dynamic lavalier in his sound kit for use as a slate mic or as an "expendable" sound effects mic.
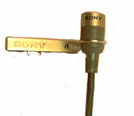
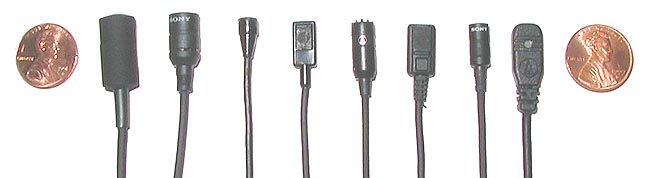 The technology of the sixties saw a miniaturization of the lavalier. The Sony ECM-50 became the broadcast standard. The ECM-50 was an electret condenser, omni lavalier. Compared to the older dynamic lavs, the ECM-50 was considered miniature, even though it was almost one inch long by half an inch in diameter. The ECM-50 was far more sensitive, and its greater bass response complimented the golden throated newscasters of the era.
Years later, Sony introduced the ECM-30, a smaller and less expensive version of the ECM-50. Film and video people took a liking to it immediately. The ECM-30 was much smaller and easier to hide. More importantly, the mic lacked the extended bass response of the ECM-50, which translated into less wind noise and rumble when used outside of a studio.
(Sony evolved the ECM30 into the ECM44; and the ECM50 became the ECM55.)
Of course, over the years, other manufacturers entered the marketplace with lavaliers of their own. Witness the ElectroVoice CO-90, the TRAM TR-50, the MiniMic, the Sennheiser MKE-2, and others.
Which brings us up to the present.
Modern lavaliers can be described as being either "Proximity" or "Transparent".
A Proximity type lavalier is defined as a microphone that works best when kept fairly close to the source of the voice, emphasizes that voice, and suppresses background.
A prime example of this sort of lavalier is the Sony ECM-55 (the current successor to the ECM-50).
Proximity lavaliers produce the "lavalier perspective"; emphasis of the voice in a "tight close-up" sort of way. You know -- the newscaster, stand-up reporter, on-camera narrator, radio interview, voice of authority kind of sound.
Proximity lavaliers are the best way to go if you desire an authoritative sound with minimal background noise. They are also the mic of choice if there is simultaneous sound reinforcement (public address), since they are not as prone to cause feedback as other more sensitive mics.
Transparent lavaliers are defined as sounding more like omnidirectional recording studio mics. They are very sensitive to sounds, and their volume vs. distance characteristics are far more gradual than that of proximity lavaliers. Transparent mics can be deployed at greater distances; and are far more forgiving of talent turning their heads away from the mic.
Transparent mics sound much more natural and less forced than proximity mics. Used on a video set, these mics will intercut much easier with overhead boom mics.
The drawback to transparent mics is that they are much more sensitive to background noise, and also require greater skill to hide under clothing.
Lavaliers can also be classified as omni-directional or uni-directional (cardioid). For use in production, I prefer omni-directional over cardioid. Omni lavs are not affected by shifts in clothing angle or body angle, which are common events when we hide them under wardrobe during theatrical filmmaking. Clothing can shift around slightly as the actor moves aggressively. If the mic were directional, it might suddenly be aimed 15 or 20 degrees away from the mouth.
Also, an omni pattern means that we do not have to concern ourselves with the angle of the mic capsule when we rig it, thus giving us more creative freedom to hide mics in places where it does not aim towards the mouth, such as on the side rim of eyeglasses or the under brim of a hat.
Cardioid pattern lavaliers, on the other hand, need to be carefully positioned so that they point to the mouth. This is easy to achieve if we are using a tie clip mount in the chest area, center shirt or center lapel. Rigging a stoic lecturer or preacher in this manner would not be a problem; and the fact that the mic is directional would help prevent acoustic feedback from a live sound system.
Cardioid lavaliers can be useful at times as hidden plant mics, if you are able to effectively position the mic so that it aims toward the actor like a miniature shotgun mic.
As mentioned before, the Sony ECM-55 is a longtime standard of the industry and is a proximity type lavalier. It is cylindrical in shape, measuring roughly 1/2" in diameter by 1" long. This mic has a pronounced bass response, and is excellent for audio interviews, narration, and public address. It is not as useful a mic to use outside of the studio, due to its sensitivity to wind and rumble. This mic is not very forgiving of off-axis voice; when talent turns their head away the sound level drops off considerably.
On the border between proximity and transparent is the Sony ECM-44. The ECM-44 is probably the most popular all-purpose lavalier on the market. It is more open sounding than the ECM-50, but still does a good job of suppressing background. It is somewhat forgiving of head turns. The mic exhibits a slight warmth in the middle frequency range, which promotes the clarity of voice over background. Also, the ECM-44 does not have the bass sensitivity of the ECM-55, making this a better sounding microphone to use in the field.
Very similar in sound quality, but less expensive, is the Audio Technica AT803. The AT803, when its low cut setting is selected, emulates the “natural” sound of the Sony ECM44; but if you select the flat response setting, the AT803 has the fuller sound of the ECM55.
 Moving towards the transparent group of lavaliers, we come to the TRAM TR-50. This very tiny microphone differs from the Sony’s in that it has a front facing grill. The Sony’s have their openings on the top.
Remember, all of these lavaliers are omnidirectional, so it does not matter which way the mics or their grills are oriented. Just pay attention when you are rigging them so that you don’t accidentally block up or tape over the hole.
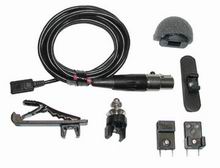
TRAMs are famous for their wide array of mounting clips and tricks. In addition to the traditional tie bars, TRAM also offers "vampire clips" (not TRAM's designation, but a nickname that has caught on), boundary plate style plastic mounts, leather tapedowns, and a host of goodies.
The sound of the TRAM TR-50 is very good. It is more transparent and natural sounding than the ECM-44, but not quite as open as some of the other transparent mics.
Countryman and Voice Technologies make some interesting lavaliers. The Countryman mics are offered in a flat faced configuration (EMW) as well as a miniature round top (B3). (Shown to the right) Countryman 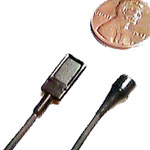 also makes a super miniature round top not much thicker than a spaghetti noodle (B6). Voice Technologies offers a flat faced configuration. What makes both of these brands interesting is that they are proximity mics (short range, strong rejection of background) but with a very natural sound. Originally created for Broadway shows, these mics are useful to filmmakers who need to mike actors within a noisy environment. But they are not good as plant mics.
 My favorite transparent lavaliers to use are the Audio Technica AT899 & MT830, Sennheiser MKE-2, and the Sony ECM-77. All of these lavaliers are extremely sensitive, and work very well as plant mics or body mics. They sound very natural, and intercut perfectly with overhead boom mics. They make excellent plant mics hidden in sets. They also allow the pickup of other persons near the actor wearing them; very handy in a documentary or covert situation.
Their drawback, however, is their sensitivity: sometimes they can hear too much background. They also require more care in rigging under clothing. But they do sound great!
Rigging Lavaliers
Outside the Clothing
In many situations, it is permissible for the microphone to be visible in the shot. Needless to say, this simplifies the process of rigging the little devils quite a bit!
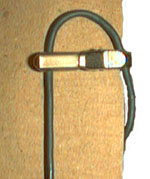
To begin with, you should be familiar with the proper technique of using a tie bar type mounting clip.
Secure the mic capsule (head) in the clip as one would expect. Then, loop the mic cable around in a "J" so that it circles upward and re-enters the tie clip. The cable should pass freely through the closed end side of the clip where it hinges (the side farthest away from the jaws). With the tie bar in place on the clothing, continue the mic cable up and around so that it completes a circle behind the clothing.
Bring the cable back down (still behind the clothing) and secure it inside of the spring jaws of the clip. The action of the metal clip will serve to eliminate conductive cable noise from being transmitted to the mic capsule. It will also strain relief the mic from any tugging or pulling on the cable.
The remainder of the lavalier’s mic cable should be hidden behind talent’s clothing. Although it is acceptable for the microphone itself to be visible to the audience, there is never an excuse to see a sloppy cable!
The thin cable of the lavalier terminates at some sort of XLR connector/power supply. This supply should be hidden either in a pants pocket, waistband, or at the ankle. Never encourage talent to drag this XLR connector around; you risk great damage to the frail cable and electronic connections. Instead, always secure the connector end to talent, and simply plug a standard XLR mic cable into it. At the end of a take, simply unplug the heavy mic cable from talent and they are free to roam the set without risk to your lavalier mic.
I have found that a heavy duty rubber band with a safety pin works well to secure the power supply inside of a waistband if there are no convenient pockets to use. A heavy sock (or at least the ankle portion of one) works well at the ankle; as also does an ACE bandage or a salvaged ankle holster. Even a strip of gaffers tape works well, but remember to line the ankle with cloth or toilet tissue first. Velcro straps are fine on males, but will destroy fine hosiery and stockings.
Clip-on lavaliers are often attached to the center chest opening of a shirt/blouse or to the necktie. They can also be attached to the lapel of a sports jacket.
If attaching to a lapel, make sure that you attach to the side most likely for talent to turn towards. (Towards the interviewer, towards the projection screen, etc.)
Although the lavalier is visible to the camera, it does not have to be conspicuous. Remember that in a wide shot, the lavalier is very tiny on screen. In a close-up, the lavalier will be framed out of the shot.
Just a little judicious camouflage will make the lavalier all but invisible. Cover the visible portions of the mic and clip with small strips of white camera tape. Color the tape with magic markers to match the color and pattern of wardrobe.
The Newsman's Loop
Proper use of the tie clip
1. Insert the mic head into clip.
2. Bring cable up and thru the hinge, and then continue down thru the jaws of the clip.
The jaws serve to mute cable vibration.
3. Frontal view. The mic cable curves around and up thru the hinge.
Then it continues behind clothing downward thru the jaws of the tie bar.
4. Seen from behind the clothing. The loop continues up from the mic and then loops down thru the jaws.
Now we're going to hide lavs under clothing.
Hiding Lavs Under Clothing
Hiding a microphone under clothing requires much more attention to detail. Not only must the mic be hidden from view, but you must also contend with the problems of clothing noise.
 Clothing noise comes in two varieties: Contact and Acoustic.
Contact clothing noise is caused by clothing physically rubbing against or striking the mic capsule or mic cable. The best means to eliminate this type of noise is to immobilize the clothing around the mic. If the garments cannot move in relation to the mic, then they cannot rub or strike the mic!
Different sound mixers have different techniques for accomplishing this feat, but my preference is the use of sticky triangles (often augmented with pins).
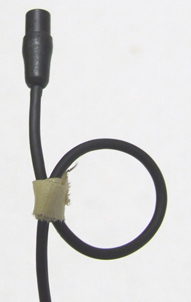
But first, we have to eliminate cable noise. Do this by forming one or two complete loops of the cable just below the mic capsule. The loops should be around 1/2 inch in diameter. Tie the loops in place with a piece of thread or dental floss, or even a thin strip of camera tape sticky side out.
The loop should be secured loose enough to open and close freely when the cable is tugged. This becomes your strain relief. (See Right)
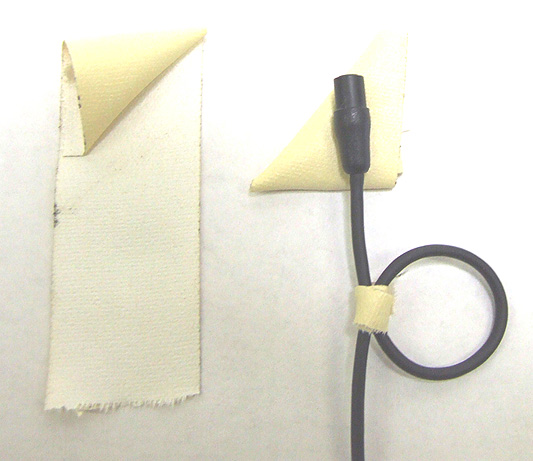 Secure the mic capsule within two small triangles of sticky tape. I make these triangles from a 1" wide by 2" long piece of camera or gaffers tape, folded corner to corner several times like a flag, sticky side always out. The mic is centered within the two triangles. Be careful not to tape over the grill or holes of the mic.
Round top mics are easier to rig, since they can be surrounded by the tape, with only the top grill exposed. Flat facing mics require more care, since the stocky triangles need to be offset so as not to block the side port.
This sticky triangle rig can be placed just above a button of a shirt/blouse (See Right). The cable loop falls opposite of the button itself. The next inch or so of the lav cable should be taped directly onto the shirt, with the tape lengthwise between buttons.
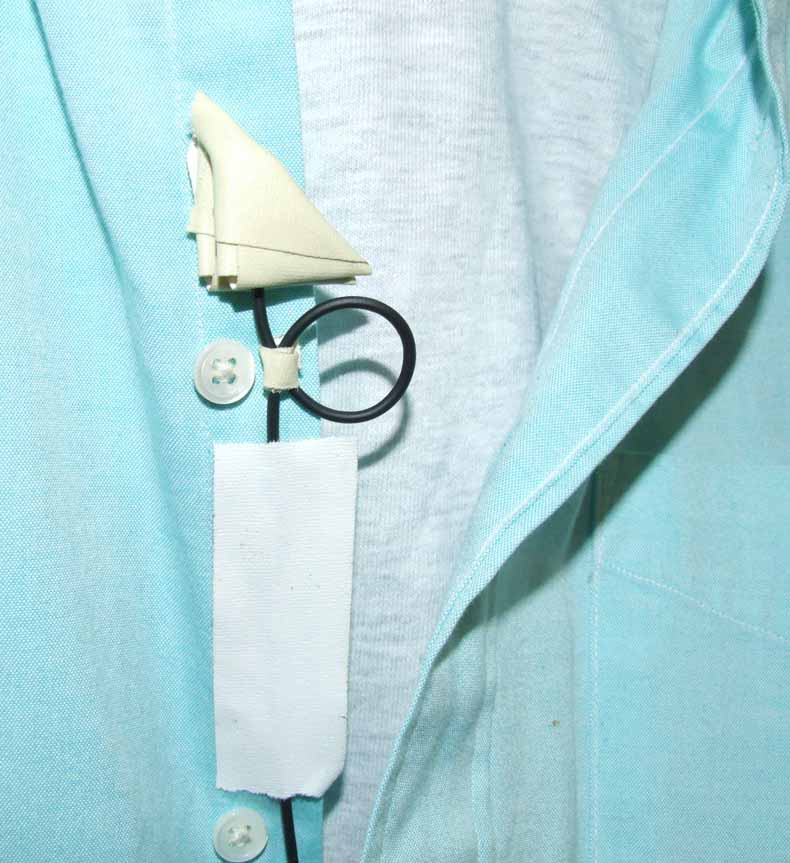 Any tugging of the shirt or cable with be strain relieved by this strip of cable. The floating loop isolates the tugging from the mic capsule. The sticky triangles anchor the clothing on either side of the mic. A couple of straight (or safety) pins may be used to secure the triangle tips if humidity or long duration are concerns.
 Another technique is to use Moleskin strips and a safety pin to anchor the weight of the mic and cable. This is very useful if the actor will be rigged for an extensive period of time, or if moisture (perspiration, humidity, rain, etc.) tends to loosen the hold of sticky tape.
Cut some adhesive backed Moleskin (found in the Foot Care dept of any supermarket or drugstore) into french fry size strips. Wrap a strip (adhesive toward the mic, softside out) completely around the body of the lav, insert an open safety pin, and continue the wrap.
The pin will securely hold the mic, but you may need to add sticky triangles to prevent clothing noise.
 When wiring a female equipped with a bra, the sticky triangle can be re-angled so that it is flatside up, pointy end down, and can be placed inside of the bra, in the cleavage at the "cross your heart" point. The swell of the bosom acts as a shield against clothing noise, and results in excellent sounding mic placement.
The other type of clothing noise is that of Acoustic Noise. Acoustic noise is created not from clothing rubbing against or striking the mic, but instead from the clothing rubbing against itself.
Static Guard works very well to lubricate clothing, such as jackets rubbing over shirts. Heavy starch conducts noise, so it is best dealt with by applying or spraying a little water mist around the mic placement area, as well as in any other areas that would not appear obvious to camera.
As a rule of thumb, cottons and woolens are the quietest clothing fibers. Synthetics and silks are very noisy and should be avoided as much as the situation allows.
Lavaliers can also be hidden in other areas than just center chest. Under the collar works well with sweaters and sweatshirts, or women’s blouses. Going under the collar of a dress shirt on a male may create a problem if beard stubble is present on the neck.
Less conventional mic sites include under the brim of hats, or hidden in the hair at the forehead. Small lavaliers can also be hidden on the frames of eyeglasses.
A very useful trick is to hollow out a plastic pen, and hide a lavalier inside. With but a very small incision in the back of a pocket, a pen mic can be planted in full visibility to the camera, with no clothing noise, and still remain completely "hidden."
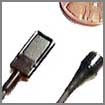
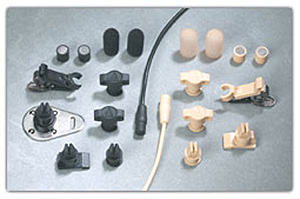
 An interesting lav mic, now sadly discontinued, is the Pin Mic.
It is currently no longer imported into the USA, which is a shame, considering how well the concept worked. For more information about the PIN MIC, contact Coffey Sound in Hollywood, California. However, Rode is now offering a less expensive version of the Pin Mic, which eliminates clothing noise, but is no longer as concealable as the original.
 Although this mic is worn outside of clothing, it is extremely concealable. The concept of the PIN MIC is so simple that it is brilliant. Instead of fussing around with tie bars, vampyre clips, unsightly cables, and awkward mic placement -- just poke the pins of the backplate thru the wardrobe and cap it with the microphone capsule! Because the microphone is outside of clothing, there is virtually no clothing noise to contend with.
Since the mic capsule mates to its electronics via PINS, you can position the mic almost anywhere on talent. You are no longer limited to lapels and center button-up openings. T-shirts, pullovers, and dresses are not a problem anymore.
On the camera side of things, all that is visible is a nondescript round capsule about the size of an aspirin. Using just the black or white sleeve covers that go over the mic capsule, the PIN MIC usually just blends into wardrobe on its own. But if you need better invisibility, you can attach whatever you want onto the face of the mic sleeve (the PIN MIC has ports on the circumference, so that the face is okay for mounting things to).
For example, you can cover the PIN MIC with a spare shirt button. Hide it under a corporate or station logo jewelry pin. Cover it with a snippet of cloth. Mask it with colored tape, or use a colored marker to paint some plain tape. One mixer that I know shoots & prints a digital picture of the wardrobe, and then pastes a snippet of the print over the mic to make it perfectly blend in.
Now we'll deal with the two biggest challenges when using lav mics: noise and perspective.
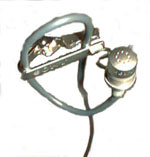
Wind Noise
There are two types of wind noise: Contact and Acoustic. (Sound familiar? Did you pay attention to the article about Shockmounts & windscreens?)
Contact wind noise is the one we most frequently associate with microphones. That is the distortion caused when wind strikes the diaphragm of the mic itself.
The solution is to use a good windscreen. Which you will have to make yourself, because the flimsy little puffs of acoustic foam that come with most lavaliers are merely breath pop filters, not real windscreens!
The simplest tool for blocking wind is to salvage the foam booty that makes up the working end of a video head cleaning swab. After you service your video heads, save these sticks! Believe me, the micro dust collected from a video head will not affect sound quality on a windscreen.
Pull the foam tips off of the wooden sticks, and then slice them open at the base to form a foam cap. Slide the foam over your favorite lavalier, and instant windscreen. Since these screens are disposable, feel free to color them with markers for less visibility.
If rigging under clothing, feel free to sandwich them inside of your sticky triangles. So what if the tape destroys them!
A greater level of wind protection can be achieved by placing an oversize metal grill (such as from an ECM-55) over the foam.
Another trick is to wrap a thick layer of cheesecloth over the foam and the mic. For visible mics, snip the fingertips off of a pair of wool knit children’s winter gloves, and pull the wool "caps" over the cheesecloth. With a layer of wool, cheesecloth, and foam — you’re very well insulated from wind noise.
When hiding lavaliers inside heavy winter coats, a good technique is to bring the mic to the outside of the coat (to avoid excessive muffling) and to hide the mic under a patch of cloth or felt. These patches are readily obtained as "sample" swatches from any fabric store. Cut the swatches into a random pattern, so as not to be conspicuous. Rub some dirt over the patch to help blend it in.
The other type of wind noise is Acoustic. That is the sound of the wind howling through the trees or between the buildings. It is a form of background noise, like traffic noise, and cannot be eliminated by the use of a windscreen. Your best solution is to keep the mics close to talent. Rolling off the bass frequencies also helps a little, but wind howling is often all over the frequency spectrum.
Lavaliers as Plant Mics
The best solution to clothing noise is to keep the lavalier off of the body entirely.
Lavaliers are too stupid to know whether or not they are attached on the body, or just near one. It is a simple matter to hide lavaliers onto many handheld props, such as purses, clip boards, flash lights, cups, etc.
Remember to use a wad of sticky tape to "float" or shockmount the mic capsule so that it is not directly against a hard surface that might conduct vibration.
To rig a car, hide a lavalier on the inside of the sun visor. Any decent transparent lavalier will pickup driver, passenger, and probably backseat passenger. The visor is padded to reduce echo, and well away from the bottom of the car with related engine & road noise.
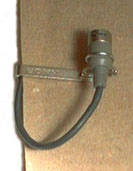
Transparent lavaliers also work well as hidden mics in the set. A mic in the centerpiece can give you a restaurant table. A mic in an executive pen set can pickup both sides of an across the desk encounter.
 A mic on the inside of a doorjam can give you that short line from a passerby poking his head into the office. (Click the thumbnail for the whole picture.)
Use your imagination! A telephone booth is a snap to rig. Someone reading directly off of a blackboard or bulletin board is perfect for a hidden lavalier. The headboard of a bed for those "marital relations" shots.
Perspective
A danger of using lavaliers is to forget to take perspective into account. A proximity lavalier always sounds like a tight close-up, even when the camera is fifty feet away.
Transparent mics sound much more natural, but unlike boom mics, their perspective is fixed. Booms move from farther to closer as the frame changes; lavaliers do not.
One quick fix to the perspective problem is to also deploy a shotgun mic directed at nothing in particular. The "bleed mic" is used to capture footsteps, ambiance, and general sound effects from an angle that will not pick up dialogue (two mics capturing the same sound will create phasing problems, echo, and tinniness). For long perspective, the bleed mic is mixed (say, 30%) with the dialogue from the lavalier. As the shot narrows to a close-up, the bleed mic is faded down, so that we are only left with the close-up sound of the lav.
Another trick to open up perspective when using lavaliers is to place them a little further down on the chest than normal. This creates a noisier track with more ambiance and less forced emphasis of voice.
Two actors playing opposite each other can be miked from each other’s lavalier, again opening up the soundtrack to appear more natural.
As you can see, there are a lot of ways to effectively utilize lavaliers.