 Students frequently ask me what the difference is between a Sound Report and a Log Sheet. They also ask about Header ID's and Userbits Timecode.
Sound Reports are the production notes created by the Production Sound Mixer on the film/video set or in the studio while recording dialogue and sound effects. It is a detailed history of every take that was recorded, whether these takes are "printed" or not. (The decision to earmark a take as "printed" is done to economize the creation of sync picture + audio dailies, and is usually determined on the basis of picture quality and performance quality. Rarely, if ever, is it based on audio recording factors, except in the case of a catastrophic incident.)
Sound Reports are a history of each day's recording session. They are used to keep track of everything recorded; and are often referenced by the DIT, film labs, and mainly the editors. Not only does it inform everyone of WHAT was recorded (scene/takes), but HOW it was recorded (how many tracks, mono or stereo live mixes, attenuated "safety" tracks, track assignments, general notes).
If it is an "audio only" project, we still create sound reports. However, perhaps instead of scene/take, the audio engineer would refer to sections of the script. Examples: Question 1, Take 1. Question 1, Take 2. Or, Paragraph 1, Take 1. Or, Page 2, Take 2. Obviously, talent will require multiple takes with lots of "pick ups" to complete each section. The Sound Report documents all of this and serves as a useful guide to the Editor.
Sound Reports should include all of the Header ID or project data, such as:
Production Title and/or Number
Date
Location
Name of the Production Sound Mixer (the person, not the mixing board!)
Make and Model of the Recorder
Track Format (i.e. mono, dual mono, 2-track, 4-track, 8+2, and so on)
Bit and Sample Rate
Timecode frame rate (if there is NO timecode, that detail must be specified as well)
Reference Tone Level
Below this header data, there should be a table grid for entering in the pertinent take information. There should be columns for:
Filename (Not all recorders allow the user to easily custom name their files with the complete scene/take. Sometimes an abbreviated or sequential name is stamped by the recorder, especially in the case of prosumer units. This is the filename that will appear on your computer screen after the raw media has been copied to your laptop.)
Scene/Take. Use this column to write in the correct Scene/Take number that corresponds to the filename. You can also use this space to indicate a Scene/Take numbering error.
Print [] Check to indicate that this was a circled or printed take.
Timecode start/end Just an approximate timecode location, the editor does need frame precision data. Often, they do not need the end, either. Include the Userbits (once) for each group of takes; and then show the new Userbits (once) as you modify it during the day.
Track Assignments Sometimes this is located on a second row, due to space limitations. Indicate content for Lmix, Rmix, and tracks 1-8 (or whatever your format is). Try to keep your track assignments consistent as much as possible. If a take does not involve all of the main characters, it is better to leave that track empty or mute, then to re-shuffle all of the other talent. For example, your tracks might read: Lmix=Main, Lmix=Main attenuated 10dB, 1=boom, 2=boom2, 3=plant1, 4=Joe, 5=Mary, 6=Tom, 7=Jill, 8=Misc cast.
Notes There should be a column for notes and comments.
A Sound Report should be turned in along with each day's media. Make sure to keep a copy for yourself. Some mixers are high tech and create their sound reports using custom software, and then print their copies out on a mobile printer; others just resort to old fashioned carbon paper. Whatever works for you!
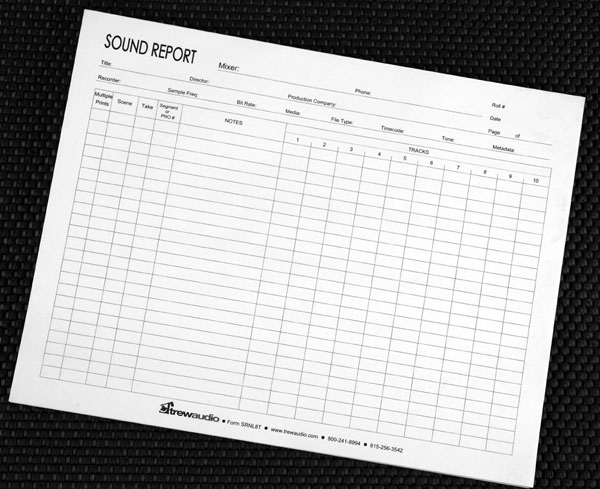
Some audio supply companies offer generic sound reports for sale, such as the pictured example from Trew Audio; but I prefer to customize my own based on the situation. Here are links to sound reports from Location Sound Corp and Trew Audio: LSC_10_trk, Trew_4_trk, Trew_10_trk.
Here is a modified Trew Audio sound report that I use with my TASCAM HS-P82. TASCAM_report_10trk.pdf
Index/Log Sheets are different than Sound Reports, in that Log Sheets reflect the content of the media, as opposed to being a history of the filming day. Index Sheets are what you turn in along with a project assignment. Sound Reports are what you turn in for each day of film production, listing all of the scene/takes. Here is a sample Index (Table of Contents) filled out, along with a blank template. Index_sample, Index_sample_template.
A Log Sheet or Index Sheet should also have all of the Header ID or project information, same as the Sound Report. But the Log Sheet is generally NOT a history of scene/takes and track assignments, but serves as a table of contents or an index of what is being turned in (to the client) for a particular assignment. A Log Sheet would NOT include information about bad takes or bad edited versions that you are NOT turning in for review. It would only be an index to the selected and copied files on the disk or drive that the student has elected to submit. In real life, the index/log is intended for your client. It should only list the "good stuff" and not imply that a lot of time and money was wasted during the recording session. When you submit material to the Client for them to review, you should only copy over the Header ID file, along with only the selected takes or versions that are ready for the client to judge.
Remember that a Sound Report is for the Editor and facilitates sorting out all of the raw material. The Log Sheet/Index is the table of contents for the presentation disk (flash drive, etc.) to show what files are being submitted, what the sometimes cryptic or abbreviated file names represent, along with the technical specs and general notes.
Each entry for the Log Sheet should also have columns denoting the file name (as it appears on the computer monitor), the actual scene/take or Project Title, and whatever notes would be appropriate.What is listed on the Log Sheet MUST match up exactly with what is submitted on the disk or drive in terms of content. No more and no less. And ONLY INCLUDE those files requested by or intended for the client. Never make the client have to sort thru a lot of garbage to find the files intended for their review.
The final format of your Sound Report or Log Sheet will vary depending on the nature of the production or the assignment. The most important thing to remember is that your layout and contents should be arranged neatly and easy to understand either by the editor or the client. Put yourself in their shoes, and think about what kinds of information are essential to help them do their jobs, or to evaluate your assignment.
The Header ID, in case you are new to all of this, is a verbal slating of the project information that must accompany every batch of dailies or every media card/drive/disk that gets turned in. One Header ID per media should suffice. The spoken Header ID should include all of the items listed above, along with a 30 second recorded Reference Tone. The Reference Tone should be clean and not wavering; I have had students turn in tone that kept changing its volume every couple of seconds, ranging from --60dB to --10dB (when it was all supposed to be a steady --20dB). That kind of instability rendered the tone useless to an engineer for setting proper import or playback levels.
Always write out your information on a card before attempting to live record it. Otherwise, you will sound unsure of what to say, and come off as professionally incompetent.
You should always record and include one Header ID file along with each batch of dailies turned in, as well as on each individual media card or drive that is being saved or archived. The HEADER ID should be file named as: Scene_HDR. Example, if this is for scene 104, your filename in the recorder would be: 104_HDR After recording the Header, you would then change the scene to just: 104 , so that your first actual take would show up as 104_T001. If you recorded the header simply as: 104, then you would be using up take 1, and the actual first take of the scene would have to slated as take 2. Confusing, right? Plus, by including HDR in the scene name, it is obvious to every one that this is the header information.
Every verbal Header ID should include the following information:
Project Title
Date
Location
Soundmixer;s Name
Brand/Model of the Audio Recorder (also indicate if audio is being sent Direct to Video as well)
Track Format (examples: mono, dual mono, dual attenuated mono, 2-track discreet, stereo, 4-track, 8 mono ISO tracks plus stereo live mix in dual attenuated mono, etc.)
Direct to Video format (if applicable)
Recording Format (such as 24bit/48k)
Timecode Frame Rate (such as 23.976 or 24 native) If there is NO TIMECODE on the tracks, you must specify that as well.
Reference Tone (usually negative 20dB) If you are recording Direct to Video, you also need to specify what the ref tone is on the video camera, since it may be different than what is on the audio recorder.
Userbits are non-changing information that is appended to and part of the timecode data, such as a date, production number, or other simple value. It is important to always enter a value for the user bits, since timecode alone will eventually repeat itself after 24 hours. A unique value in the user bits area for each timecode cycle (24 hrs or less) will make it easier for post-production computers to identify material that otherwise might have the same timecode data. Userbits are 8 characters, and can include numbers 0-9 as well as letters A-F.
For example, I like to use the first 4 characters to represent the month/date; and I always update the date at midnight (if working late) or each morning. That guarantees that my userbits will never repeat itself in the dailies. The remaining four characters can be used for whatever you want. Personally, I like to cross-reference the camera media data, such as roll number, card number, or drive number.
It is important to remember that whenever you update the Userbit data in the recorder, you must also jam sync the timecode slate and the camera.
Include the Userbit data on your Sound Report; and always indicate when you update or change the Userbit data.