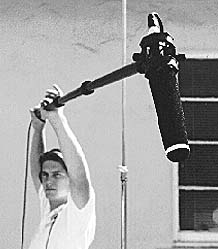
![]() Camera-mounted mics may be adequate for general ambiance and background effects, but they lack the reach and versatility of boom mounted mics. Placing the microphone where the lens is may be convenient but it certainly does nothing to assist in picking up good sound.
Camera-mounted mics may be adequate for general ambiance and background effects, but they lack the reach and versatility of boom mounted mics. Placing the microphone where the lens is may be convenient but it certainly does nothing to assist in picking up good sound.
 For one thing, on-camera mics tend to hear zoom motors and other camera created noise.
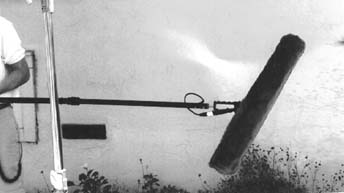
Mounting the mic parallel to the ground is not a good practice, either. Shotgun mics are similar to telephoto lenses in that they both compress planes of action so that very little distance appears to separate foreground and background action.. If you point a mic horizontally towards a person, you will pick up the sound of that person as well as the background sound directly behind that person.
The best way to isolate the person from the background is to boom them from above, so that the line of sight of the mic runs towards the person's mouth and then towards the ground. (It is safe to assume that the ground or floor is not as noise producing as the background.)
Finally, the camera lens has the ability to see much further than even the best shotgun microphones can hear. A long lens can easily frame a tight close-up of a person's face from 50 feet away; but the only thing that a mic would pick up at that same distance would be general background ambiance of everything in the entire wide scene. To achieve good sound, you have to get the mic as close as possible to the action!
Boom it from above if you can
Overhead miking from a fishpole or studio boom is the most favored technique in the feature/TV/commercial industry. It is probably the best choice 90% of the time.
Generally, overhead miking will yield the most natural sounding dialogue with the least amount of mixing and editing effort.
It provides a pleasant blend when there are multiple actors involved. Two, three, even a small group of people interacting can all be recorded from a single mic.
A mic on a fishpole or boom allows for a fair amount of physical activity and movement by the talent. Actors are free to enter and exit a scene, move around, jump around, climb around, etc. There are no trailing mic cables to inhibit their range of motion. Nor are there the frustrations of dealing with finicky wireless mic systems with their inherent problems of environmental RF interference.
An overhead mic will pick up sufficient sound effects, footsteps, and hand-prop noise to give the soundtrack a full texture. Because the faces are closer to the mic, dialogue will dominate the track, but other sound effects will still be audible.
Audio perspective is easier to maintain with an overhead mic. On a wide master shot, the mic tends to be higher so that the resulting dialogue seems thinner and more "distant". On close-ups, the mic can be lowered giving the sound much greater presence and "nearness" to the screen.
But what if there are physical obstructions in the set that prevent deploying a microphone from overhead?
 That brings us to the next option: Boom miking from underneath. The boom mic can be fishpoled up at the talent from knee, thigh, or waist level with good results. The sound will be slightly more bassy than miking from overhead, but still quite usable and acceptable. Note that a mic aimed up at a person tends to pick up more of the chest cavity, thus accounting for the increase in bass.
Note that this excess bass can be easily rolled off by the soundmixer (if using a mixing console) or later on in post-production. It is a simple issue to remedy. But make sure that you alert the client that you are aware of the bass issue; that it is common and to be expected; and routinely fixable -- lest they fret or worry during dailies or video playbacks!
Sometimes it is much more difficult to boom from below, due to the presence of set furniture or the choreography of foreground persons. Camera operators also have to be much more careful, since it is more likely to widen the frame to show more of an actor's torso than to show more empty headroom above. Nevertheless, there will be many shots where miking from below is the simplest solution.
Tips on using your boompole
Amount of Extension
How long a boompole you will need really depends on the type of production you will be doing. Feature films, commercials, and episodic television calls for a long reach, around 12 to 15 feet, in order to cover the set. News gathering and “run & gun” documentary style traditionally only require a shorter reach, around 5 to 8 feet, since the camera crew is more mobile and working close-in.
Whenever you extend a boompole, do not lock the pole sections extended all the way to the safety stops. The proper technique for achieving maximum reach is to slide the pole section to the stop, and then back it in a couple of inches. A slight overlap will make the pole sturdier (no wilting at the locking collars) and quieter.
Another good practice is to extend the pole further than what you need for the shot so that you can grip the boompole closer to its center of gravity (think of a circus tightrope walker’s balance pole). By letting the pole counterbalance itself in your hands, your muscles will not be exerting to overcome torque. Some boompole manufacturers, such as K-Tek, even offer weights that attach to the bottom of poles to achieve more comfortable balance.
Preventing Cable Noise
Cable noise in a boompole can originate from three problems: conductance, percussion, and loose connections.
Conductance is noise or rumble (physical vibrations) that travel along the sheath of the cable. To prevent this, the inside tube section of the boompole should be foam dampened. For instance, in the poles that I use, the cable is fully enveloped in compressed foam rubber for the entire length of the inside section. Note that you cannot line the remaining sections of the pole, or it will not be able to telescope.
To maintain the pliability and cleanliness of the mic cable, routinely wipe it down with a restorative solution such as Armor All™.
Percussion is noise created by the cable banging against the remaining tube sections of the boompole. Since the pole telescopes, it is impossible to foam dampen any but the innermost tube.
The best technique for controlling cable percussion (on poles that have internal cables that flow out of the side or bottom) is to keep the cable taut while holding the boom. As the cable exits from the pole, loop it around the little finger or thumb of your supporting hand and keep the line snug. Do not allow the cable to merely exit the pole and drop to the floor!
 If your boompole has an internal coiled cable, then the entire cable is kept fully contained inside of the pole. There is nothing that you can do to reduce the coil from colliding with the sides of the tube, other than trying to keep the pole at full extension as much as possible. Internally coiled cables are very convenient, but are inherently noisier than flow-thru cables. We find that coiled cables are more common for news, documentary, and reality shows; flow-thru cabling is more popular on feature film sets.
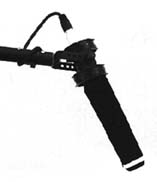
The final cause of cable noise can be the mic connection. XLR connectors on mics as well as cables have been known to loosen from continuous usage. Place a strip of cloth camera tape over the junction where the microphone connects to the boom cable to protect against intermittent connection occurring when the mic is moved around.
Always maintain some slack in the cable connection between boompole and microphone. A taut cable will conduct handling noise.
On the same token, too much excess cable can flap around and cause noise. This excess can simply be wrapped once or twice around the pole beneath the shockmount.
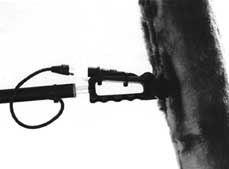 The cable on some poles may be cable-tied in a small loop where it exits the tip of the pole in order to reduce conductance as well as to serve as a strain relief.
Another useful trick is to use a short jumper cable inside of your blimp windscreens. This cable should terminate at the handle of your shockmount, and be permanently attached with cable ties or tape. It will simplify the process of mounting your shockmount to the pole, because it will no longer be necessary to open up the windscreen and dress the cable every time you need to use the mic.
Holding the boom
To reduce handling noise, grip the pole firmly but not tightly with your fingertips and avoid excess hand or finger movement such as tapping or drumming. Some boom operators wear white editing gloves to reduce finger sticking on excessively cold or hot days.
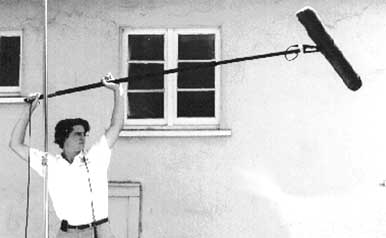
Hold the boom parallel to the floor and high above your head with both arms. If you support the boom underhanded like a flagpole, the boom will enter the scene at a steep angle. Although the mic may be high enough to clear the frame line, the body of the pole may cut across the corner of the frame.
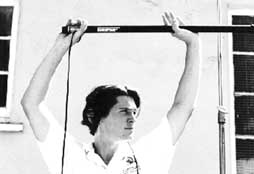 Proper arm placement: vertical and close-in.
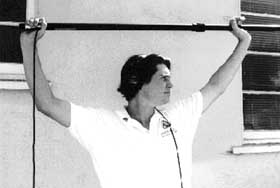 Keep your arms close to your head, sort of like a capital "H". When your arm is vertical with the elbow locked, all you are doing is supporting a couple pounds of weight in a straight line with your body. If your arms are extended in a wide "V" (see picture at right), your muscles will fatigue quickly. Also, when your arms start from a true vertical, it is possible to quickly reach in or out with the boom to follow the action.
Use your front arm as a fulcrum to support the pole above your body. If the situation permits, grip it towards the natural balance point of the boom. Use the rear arm to steer (pan/tilt) the boom, as well as to rotate the pole in order to cue (aim) the microphone.
If you are new to booming, and find that you need support in holding the boom during long takes, here is some advice. Do not put a support under the boompole itself. Instead, arrange a support for under your elbow. For example, rig a sandbag or small pad on the top of a lighting stand, and position the stand just under where your supporting elbow will be for most of the take. Because the pole remains completely in your hands, there is less noise during "landing" and "take-off".
Microphone Placement
Try to position the mic as close to the action as possible. Depending on the situation and the characteristics of each particular microphone, your mic may be several inches to a few feet overhead of talent.
Be aggressive in your mic placement. Ten feet overhead may be very convenient for the camera and lighting crew, but your dialogue will be poor. Remind the director that a wide angle lens can always be tilted downward so that the frame is not filled with ceiling or sky at the cost of his soundtrack!
Professional boom operators often place a strip of white tape on the tip of the windscreen so that the camera operator can readily spot if the mic has dipped into the shot. Better to see the mic in the viewfinder than to wait until it shows up on the big screen.
To establish a working frame line, dip the mic completely into the shot and slowly raise it up until the camera operator tells you that you’re just barely clear. If you start the boom up high and gradually lower it towards the frame, the camera operator will usually play it very conservative and tell you to stay higher than necessary.
Boom operators should always wear headphones so that they can monitor, not just their own shotgun mic, but any and all mics that may be in play on the set. If the boom mic picks up audio that is simultaneously being heard on the same track by a planted microphone or lavalier, there may be an immediate increase of echo and hollowness caused by phasing interference.
In conclusion
 The microphone boompole, in all of its relative simplicity, is usually the best tool for acquiring dialogue on the set. But the art of booming is a skill that requires a basic knowledge of microphones; gentle strength; and complete concentration. It is not a task or crew position to be assigned to anybody standing around on the set.